Hawkeye Guide: Abilities, Counters & Tips | Marvel Rivals
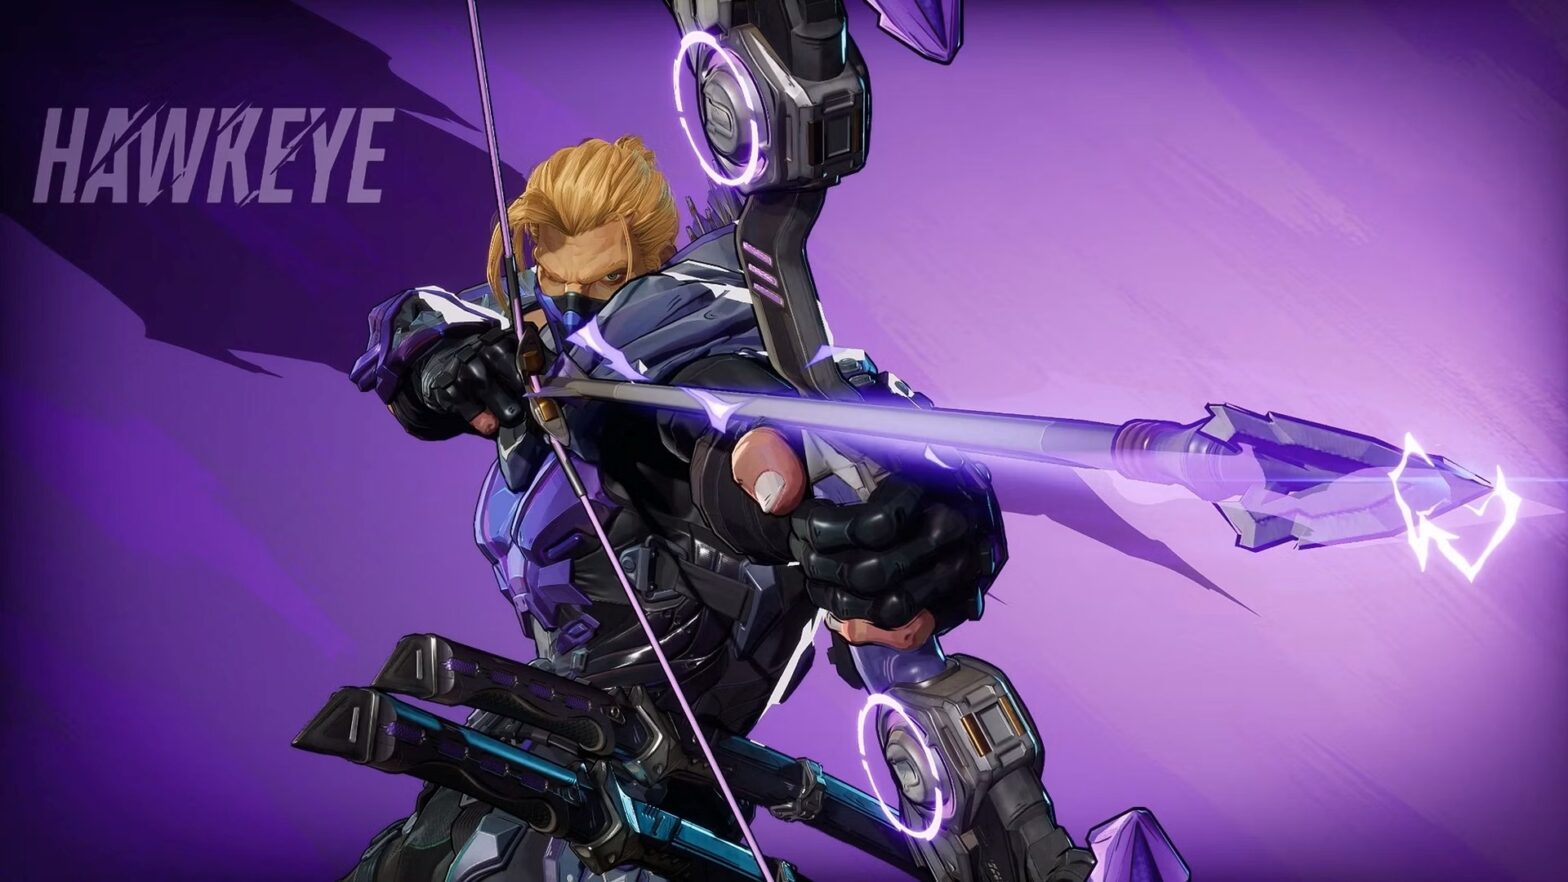
Marvel Rivals Hawkeye – Complete Guide
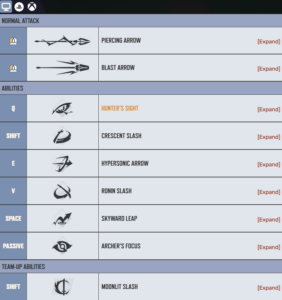
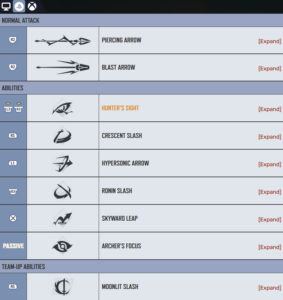
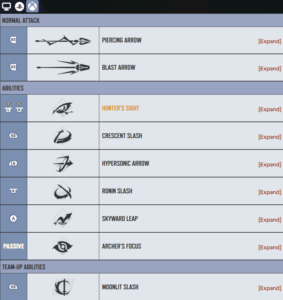
Hawkeye’s Abilities (Images via Marvel Rivals Wiki)
Last Updated: January 24, 2026
Author: Darren Buser
Hawkeye is Marvel Rivals’ most lethal precision sniper and one of the highest skill-cap Duelists in the game. Clint Barton brings pure marksmanship to the battlefield, capable of eliminating any Strategist or Duelist with a single fully-charged headshot. Ranked as S Tier in our comprehensive tier list, his Archer’s Focus passive amplifies damage the longer he tracks targets, rewarding patience and accuracy with devastating one-shot potential. Season 1 balance changes (January 10, 2025) reduced his oppressive long-range dominance while maintaining his identity as the game’s premier sniper.
Role: Duelist (Ranged DPS)
Difficulty: 4/5 (Highly Aim-Dependent)
Health Pool: 250 HP
Best For: Long-range poke compositions, backline elimination, punishing positioning mistakes
Key Strengths
- One-shot elimination potential on most non-Vanguard heroes with fully-charged headshot (320 damage base, 384 with Season 0 bonus)
- Unlimited ammo on Piercing Arrow primary fire (no reload required)
- Archer’s Focus passive stacks damage up to 70 bonus damage when tracking targets
- Hunter’s Sight ultimate creates afterimages that redirect damage to actual enemy positions
- Double jump (Skyward Leap) provides vertical mobility and escape options
- Hypersonic Arrow deals bonus damage to airborne enemies, countering flyers
- Melee tools (Crescent Slash, Ronin Slash) provide self-peel against dive threats
- Team-up with Black Widow grants her 20% damage boost
Finding reliable Vanguards who’ll actually protect backline DPS? Hawkeye thrives when tanks create space and peel divers. GameTree’s Discord LFG bot connects you with Marvel Rivals players who understand positioning and peel priority. Just type /lfg Marvel Rivals in any Discord server with GameTree installed—no signup needed for basic matchmaking.
Quick Overview: Hawkeye’s Playstyle
Hawkeye functions as a long-range elimination specialist who controls sightlines and deletes priority targets from safe distances. Unlike mobile flankers (Spider-Man, Magik) or frontline brawlers (Iron Fist, Wolverine), Hawkeye positions 30-40 meters behind his team’s frontline—far enough to avoid dive pressure, close enough to capitalize on his Archer’s Focus damage amplification.
The core gameplay loop revolves around target tracking and patience. Archer’s Focus requires roughly 1 second of continuous aim on an enemy before reaching maximum damage amplification. This means Hawkeye players must track moving targets smoothly rather than relying on flick shots. Season 1 nerfs reduced Archer’s Focus trigger distance from 60 meters to 40 meters and maximum bonus damage from 80 to 70, making positioning more critical than ever.
Hawkeye’s win condition is simple: eliminate enemy supports and squishy DPS before they can heal or trade damage. A fully-charged headshot with maximum Archer’s Focus deals 320+ damage—enough to one-shot Luna Snow, Mantis, Hela, and most other Strategists/Duelists. Against coordinated teams, he becomes the priority target that forces enemies to commit dive resources, creating space for his teammates to capitalize.
Critical Weakness: Hawkeye has zero self-sustain and minimal escape tools. His 250 HP pool means dive assassins (Psylocke, Spider-Man, Venom) can 100-to-0 him in under 2 seconds if he’s caught without Crescent Slash or Skyward Leap available. Success requires perfect positioning awareness—knowing when to take shots versus when to reposition is what separates good Hawkeyes from feeders.
Abilities Breakdown
Primary Fire: Piercing Arrow (Left Click)
Description: Fire powerful arrows that deal massive single-target damage. Unique among ranged DPS, Piercing Arrow has unlimited ammo—Hawkeye never reloads, simply nocking another arrow after each shot.
Statistics (As of Season 1 – January 2025):
- Base headshot damage: 320 (without Archer’s Focus)
- Base bodyshot damage: 160
- With full Archer’s Focus: +70 damage (390 headshot, 230 bodyshot)
- Season 0 bonus (20%): 384 headshot, 192 bodyshot (reduced to 15% in Season 1)
- Fire rate: Approximately 0.9 seconds between shots
- Charge time: Hold to charge for maximum damage (partial charge = reduced damage)
- Type: Projectile with near-hitscan speed (very minimal travel time)
- Damage falloff: None (full damage at all ranges)
Tactical Tips:
- Charging mechanics: Piercing Arrow can be fired instantly for ~50% damage or held for full charge. Full charge takes approximately 0.5 seconds and is telegraphed by visual bow-draw animation. Against stationary targets or during Hunter’s Sight ultimate, always full charge. Against evasive targets, rapid-fire uncharged shots can apply pressure.
- Archer’s Focus synergy: The damage amplification passive requires continuous tracking for maximum value. Practice smooth tracking on moving targets rather than flicking between targets. If you lose LOS or switch targets, Archer’s Focus resets to zero, wasting your damage potential.
- Target priority system: (1) Enemy supports healing critical targets (delete Luna Snow/Mantis before they heal frontline), (2) Low-HP carries trying to escape (finish wounded Hela/Punisher), (3) Airborne heroes (Hawkeye counters all flyers—prioritize Iron Man/Storm), (4) Tanks only when no other targets available (inefficient—requires 5-7 headshots to kill Vanguards).
- Headshot discipline: Unlike bodyshot-focused heroes (Punisher, Star-Lord), Hawkeye’s entire value proposition is precision headshots. 320 damage headshot vs 160 bodyshot means headshots deal 2x damage. If your headshot accuracy falls below 40%, you’re contributing less than most other Duelists.
- Jiggle peeking: The 0.9 second fire rate allows peek-shoot-peek rhythm. Expose yourself for 0.5 seconds to fire full-charged shot, immediately return to cover, repeat. This minimizes exposure to enemy fire while maintaining damage output.
Advanced Mechanics:
Hawkeye’s unlimited ammo means you can apply constant pressure without resource management concerns. However, each missed shot represents wasted time where enemies can heal or reposition. High-level Hawkeye players fire 60-70% accuracy, landing headshots on 40-50% of shots. Practice tracking moving targets in training mode before entering competitive matches.
Secondary Fire: Blast Arrow (Right Click)

Description: Fire three explosive arrows in a cone pattern that deal AOE damage on impact. Limited by resource meter rather than ammo count.
Statistics:
- Arrows per volley: 3 explosive arrows
- Individual arrow damage: 45 (without bonuses)
- Total potential damage: 135 per volley if all 3 arrows hit same target
- Maximum volleys: 3 (can fire 3 times before resource depletes)
- Total burst potential: 405 damage if all 9 arrows hit (unrealistic in practice)
- Reload time: Resource meter regenerates over ~3-4 seconds
- Range: Effective at 10-15 meters (mid-close range)
- Spread pattern: Cone shape (Season 1 nerf slightly reduced spread angle)
Tactical Tips:
- Close-range panic button: When flankers (Spider-Man, Psylocke) dive your position and you miss the Crescent Slash timing, spam Blast Arrow point-blank. The cone spread means at least 2-3 arrows will hit even without precise aim, dealing 135-200 damage that forces them to retreat or die.
- Tank shredding: Against advancing Vanguards (Thor, Hulk, Venom), Blast Arrow deals respectable chunked damage that Piercing Arrow bodyshots can’t match. Fire all 3 volleys into their frontline before resource depletes, then swap back to Piercing Arrow.
- Finishing tool: After landing one Piercing Arrow bodyshot (160 damage), Blast Arrow guarantees elimination on most wounded targets. The projectile travel time is fast enough that enemies can’t dodge unless they have active mobility ability.
- Grouped enemies: On control points or payload clusters, fire Blast Arrow into grouped enemies. Each arrow can hit multiple heroes if they’re stacked, creating 200-300 total damage across team.
Common Mistake: Players waste Blast Arrow trying to snipe long-range targets. The cone spread and range dropoff make this ineffective. Save Blast Arrow for guaranteed close-range damage or emergency self-peel situations.
Crowd Control: Hypersonic Arrow (E Key)
Description: Fire a special arrow that deals moderate damage and slows grounded enemies. Against airborne enemies (anyone not touching ground), Hypersonic Arrow deals significantly increased damage and forces them to ground level.
Statistics:
- Ground damage: ~40-50 (base slow effect)
- Airborne damage: ~80-100 (bonus damage + grounds flying heroes)
- Slow duration: 2-3 seconds
- Grounding effect: Forces airborne heroes to ground for ~2 seconds
- Cooldown: ~8 seconds
- Travel speed: Fast projectile (similar to Piercing Arrow)
Tactical Tips:
- Anti-air specialist: Hypersonic Arrow is Hawkeye’s signature counter-pick tool against Iron Man, Storm, and Human Torch. When they fly, fire Hypersonic Arrow to ground them, then follow with fully-charged Piercing Arrow headshot for easy elimination. They can’t dodge while being forced to ground.
- Slow for headshots: Against evasive ground heroes (Daredevil, Magik), Hypersonic Arrow’s slow creates 2-second window where their movement speed is reduced by ~30%. Use this window to charge Piercing Arrow and land guaranteed headshot.
- Finishing tool: The ~50 damage on grounded enemies often secures eliminations on targets that survived initial headshot. Many players underestimate Hypersonic Arrow’s damage, but it’s faster than charging another Piercing Arrow.
- Predictive usage: Don’t wait for heroes to fly before using Hypersonic Arrow. When you see Iron Man activate flight mode or Storm begin hovering, preemptively fire. The projectile will hit them mid-air rather than waiting for them to gain altitude.
Advanced Strategy: Coordinate Hypersonic Arrow with teammate abilities. When Venom dives into enemy backline or Winter Soldier uses Kraken Impact, enemies often jump to dodge. Fire Hypersonic Arrow through grouped enemies to slow/ground multiple targets, creating easy focus-fire opportunities for your team.
Defensive Tool: Crescent Slash (Left Shift)
Description: Slash forward with katana, dealing melee damage and launching enemies into the air. Primary self-peel tool against dive threats.
Statistics:
- Damage: ~60-70 melee damage
- Knockback: Launches enemies approximately 5 meters away
- Cooldown: ~6 seconds
- Range: Melee range (~3 meters)
- Effect: Brief airtime (enemies airborne for ~1 second)
Tactical Tips:
- Instant response tool: When Spider-Man web-swings onto you or Psylocke teleports in, Crescent Slash immediately creates distance without aiming requirement. The knockback interrupt gives you time to Skyward Leap away or land follow-up Piercing Arrow headshot.
- Environmental kills: On maps with ledges (Klyntar, Tokyo 2099), Crescent Slash can knock divers off edges for instant elimination. Position yourself with ledges behind you—when they engage, slash them backward off the map.
- Combo finisher: After landing Piercing Arrow bodyshot (160 damage), Crescent Slash’s 60-70 damage guarantees elimination on most Strategists (200-250 HP pool). This combo is faster than charging second Piercing Arrow.
- Movement locking: The launch effect locks enemies into predictable airborne trajectory for ~1 second. Use this time to land easy Piercing Arrow headshot while they can’t dodge mid-air.
Cooldown Management: 6-second cooldown means you get approximately 10 Crescent Slash uses per minute. Don’t waste it on full-HP enemies for chip damage. Save it exclusively for divers or guaranteed elimination combos.
Mobility: Ronin Slash (Q Key)

Description: Spin forward with wakizashi sword, dealing damage to enemies in path while deflecting incoming projectiles.
Statistics:
- Damage: ~40-50 per hit
- Deflection window: Active during entire animation (~1 second)
- Cooldown: ~8 seconds
- Movement: Short forward dash (~5 meters)
- Effect: Reflects projectile abilities back toward source
Tactical Tips:
- Projectile counter: Ronin Slash deflects specific projectiles including Hela’s Nightsword Thorn, Iron Man’s Repulsor Beams, Punisher’s bullets, and Luna Snow’s Freeze. Time the animation to deflect incoming damage, saving your 250 HP from 100+ damage.
- Mobility tool: The forward dash covers ~5 meters, allowing gap-closing or retreat. When caught in open area without cover, Ronin Slash provides emergency movement to reach safety.
- Ultimate disruption: Can deflect some ultimate projectiles (Scarlet Witch’s energy blasts, Hela’s Goddess of Death crows). Master players time Ronin Slash to reflect ultimates, wasting enemy ultimate charge.
- Combo with Crescent Slash: After Crescent Slash knocks enemy away, Ronin Slash closes gap while deflecting their retaliatory shots. This combo keeps pressure on wounded targets.
Important Note: Ronin Slash does NOT deflect AOE explosions (Blast Arrow, Scarlet Witch rifts) or beam attacks (Psylocke’s blades, Iron Man’s Unibeam ultimate). It only deflects distinct projectile attacks with travel time.
Mobility: Skyward Leap (Space Bar)
Description: Execute double jump in any direction, providing vertical mobility and escape options.
Statistics:
- Activation: Press jump twice
- Height: ~8 meters vertical (higher than single jump)
- Cooldown: None (gravity-limited, must land before using again)
- Direction: Any direction based on movement keys pressed
Tactical Tips:
- High ground dominance: Double jump allows Hawkeye to reach elevated positions that most heroes can’t access without mobility abilities. Rooftops on Tokyo 2099, elevated platforms on Midtown—these spots provide superior sightlines while making dive attempts harder.
- Evasion tool: When dove without Crescent Slash available, double jump creates unpredictable vertical movement that divers can’t easily track. Jump backward over approaching Venom or Spider-Man, forcing them to turn 180 degrees.
- Mid-air accuracy: Hawkeye can fire Piercing Arrow while airborne. Practice shooting during descent from double jump—enemies don’t expect airborne shots and often remain stationary assuming you’re defenseless.
- Objective contesting: During overtime pushes, double jump allows quick access to payload or control point from unexpected angles. Enemies focused on ground-level threats won’t see you dropping from above.
Advanced Strategy: Combine double jump with Hypersonic Arrow. Jump to high ground, immediately fire Hypersonic Arrow at airborne heroes below, follow with Piercing Arrow headshot while they’re grounded. This combo maximizes your airborne advantage.
Passive: Archer’s Focus
Description: Aim reticle at enemy hero to build focus, amplifying Piercing Arrow damage. Focus decays if you lose line of sight or switch targets.
Statistics (Season 1 Balance Changes – January 10, 2025):
- Trigger distance: 40 meters (reduced from 60 meters)
- Focus build time: ~1 second to reach maximum
- Maximum bonus damage: +70 (reduced from +80)
- Decay rate: Instant reset if target breaks LOS or you aim at different target
- Visual indicator: Reticle changes color as focus builds (white → yellow → orange)
Season 1 Nerf Impact: The distance reduction from 60m to 40m forces Hawkeye to position closer to enemy frontline, making him more vulnerable to dive pressure. The damage reduction from 80 to 70 means full-charged headshots deal 390 damage instead of 400, which still one-shots most non-Vanguards.
Tactical Tips:
- Commitment required: Archer’s Focus demands you commit to single target for 1+ seconds. Against teams with good peel (Mantis sleep, Luna Snow healing), you might not have 1 full second to track before target receives support. In these situations, consider rapid-fire uncharged shots instead.
- Range awareness: At 41+ meters, Archer’s Focus won’t trigger. Monitor your position relative to enemies—stepping back 2 meters can disable your entire damage amplification. Practice maintaining 35-40 meter range for optimal focus buildup.
- Target switching cost: Every time you switch targets, you lose all accumulated focus. Against spread-out enemy teams, this constant reset reduces your DPS significantly. Prefer focusing one target until elimination rather than split-damage across team.
- Maximum value timing: Full Archer’s Focus + full charge + headshot = 390 damage. This one-shots every Strategist (200-250 HP) and most Duelists. Against tankier targets (Wolverine, Punisher), you’ll need 2 headshots regardless of focus, so rapid-fire might be more efficient.
Ultimate: Hunter’s Sight (Q Key)
Description: Activate enhanced vision that captures Afterimages of all enemies in your line of sight. For the duration, stationary Afterimages appear at enemies’ current positions. Shooting Afterimages redirects damage to actual enemy location, even if they’ve moved or gone behind cover.
Statistics:
- Duration: 8 seconds
- Capture requirement: Enemies must be visible in Hawkeye’s LOS when ultimate activates
- Afterimage mechanics: Afterimages remain at capture location, damage redirects to actual enemy
- Charge speed: Near-instant Archer’s Focus buildup during ultimate
- Ultimate cost: Approximately 2-3 minutes of average gameplay
- Cast vulnerability: Hawkeye is briefly stationary during activation animation
Tactical Tips:
- Pre-activation positioning: Hunter’s Sight only captures enemies you can SEE when activated. Before ulting, reposition to high ground or wide sightline where you see 4-5 enemies simultaneously. Activating from behind wall wastes ultimate—you’ll only capture 0-1 Afterimages.
- Instant maximum focus: During Hunter’s Sight, Archer’s Focus builds almost instantly when aiming at Afterimages. This means every shot you fire has maximum damage amplification. Spam fully-charged headshots at Afterimages for 390 damage per shot, securing 2-3 eliminations per ultimate.
- Cover negation: Afterimages remain stationary even if enemies retreat behind walls. You can shoot the Afterimage and damage redirects to actual enemy location. This completely negates enemy defensive positioning for 8 seconds.
- Team coordination: Call out “ULTING NOW” in voice chat before activating. Teammates can coordinate their abilities with your ultimate—when enemies try to hide from you, they expose themselves to your team’s frontline.
- Activation vulnerability: The 1-second activation animation leaves Hawkeye vulnerable. Activate from behind cover or after using Crescent Slash to create distance from divers. Getting killed mid-activation wastes ultimate entirely.
Advanced Strategy: Hunter’s Sight excels during objective overtime or team fight initiation. When both teams are clustered on payload, activate ultimate and spam Afterimages for guaranteed multi-kills. The 8-second duration is long enough to fire 6-8 fully-charged shots, potentially eliminating 3+ squishies if your aim is true.
Team Synergies
Hawkeye thrives in poke compositions where ranged pressure forces enemies to either commit dive resources (leaving frontline vulnerable) or accept constant 300+ damage headshots. He struggles in pure dive comps that abandon backline protection. Here are his optimal teammates:
Best Vanguard Partners
Doctor Strange (A Tier) – Portal Master
Strange’s portals provide emergency escape routes when Hawkeye is dove. His Eye of Agamotto can stun diving threats mid-engage, buying time for Crescent Slash cooldown. Strange’s shields block incoming damage while Hawkeye focuses on charging shots. For optimal tank positioning strategies, check our team compositions guide.
Why It Works: Both heroes excel at long-range engagements. Strange creates space with shields and portals while Hawkeye delivers elimination pressure from safety. Portal can instantly reposition Hawkeye from danger to high ground.
Magneto (S+ Tier) – Bubble Protection
Magneto’s separated Metal Bulwark and Iron Bulwark cooldowns (Season 5 buff) mean he can bubble Hawkeye when dove while simultaneously protecting himself. His Metallic Curtain blocks unlimited projectile damage, creating windows where Hawkeye can freely charge shots without incoming pressure.
Synergy Details: When enemy team commits to diving Hawkeye, Magneto bubbles him for 200 HP shield while using Curtain to block follow-up damage. This creates 3-4 second window where Hawkeye is functionally unkillable, enough time to land 2-3 eliminations before retreating.
Peni Parker (B Tier) – Zone Control
Peni’s Cyber-Webs provide 25% movement speed and 15 HP/second healing to allies (Season 5 buff). When Hawkeye positions near Peni’s web zones, he gains passive sustain and mobility while maintaining safe distance from divers. Peni’s Spider-Drones also deter flankers.
Why It Works: Peni creates defended zones that Hawkeye can operate from safely. Her AOE healing compensates for Hawkeye’s zero self-sustain. Web zones on high ground are particularly effective—enemies must destroy webs AND climb elevation to reach Hawkeye.
Best Duelist Partners
Hela (S Tier) – Double Sniper Supremacy
The premier backline duo. Both heroes dominate long sightlines and force enemy positioning mistakes through constant elimination pressure. When one is dove, the other provides covering fire for escape. Hela’s Goddess of Death + Hawkeye’s Hunter’s Sight creates 18-second window of overwhelming ranged pressure.
Why It Works: Double sniper comps force enemies to either: (1) Commit heavy dive resources to eliminate backline (leaving frontline vulnerable), or (2) Accept 600+ damage per shot cycle and die slowly. Most teams can’t effectively pressure both snipers simultaneously.
Punisher (S Tier) – Sustained Fire Support
Punisher’s Turret Mode deals massive sustained damage that complements Hawkeye’s burst elimination potential. He provides additional backline DPS while Hawkeye focuses on priority targets. His suppressive fire also makes enemies hesitant to dive, protecting Hawkeye indirectly.
Team Composition: Ideal lineup: Doctor Strange, Magneto, Hawkeye, Punisher, Mantis, Luna Snow. This creates impenetrable backline with triple ranged DPS that enemies can’t dive without losing frontline battle.
Winter Soldier (S Tier) – Dive Threat
Winter Soldier’s Kraken Impact forces enemy team to scatter or die. When enemies focus on dodging Soldier’s slams, Hawkeye gets free shots on stationary targets. When enemies focus on Hawkeye, Soldier dives backline unopposed.
Why It Works: Opposite threat profiles. Winter Soldier requires enemies to watch airborne approaches while Hawkeye requires they hide from ground-level sightlines. This split attention creates opportunities for both heroes to thrive.
Best Strategist Partners
Mantis (A Tier) – Sleep Setup Supreme
Mantis’s Spore Slumber (sleep ability) creates guaranteed elimination opportunities for Hawkeye. Sleeping targets can’t dodge or retaliate, enabling easy fully-charged headshots. Mantis’s damage boost from abilities further amplifies Hawkeye’s already devastating damage.
Why It Works: Hawkeye + Mantis creates instant-elimination combos. Sleep dart → fully-charged Piercing Arrow headshot = dead enemy support/DPS before they wake up. This pairing excels at deleting priority targets before team fights begin.
Luna Snow (A Tier) – Sustain Support
Luna’s team-wide healing keeps Hawkeye topped off during poke phases. Her freeze mechanics create stationary targets for easy Hawkeye eliminations. Luna’s ultimate provides team buffs that stack with Hawkeye’s damage for overwhelming team fight pressure.
Composition Benefit: Luna’s fast movement speed lets her quickly return to contested objectives, perfect for maps where Hawkeye holds distant angles. She can heal from range without requiring Hawkeye to abandon his positioning.
Adam Warlock (A Tier) – Resurrection Insurance
Adam’s revive ultimate provides insurance for Hawkeye’s aggressive positioning mistakes. If Hawkeye gets dove and eliminated, Adam instantly resurrects him with invulnerability, preventing 20-second respawn timer. This lets Hawkeye play more aggressively knowing resurrection is available.
Why It Works: Hawkeye’s elimination potential is so high that keeping him alive justifies Adam’s ultimate usage. A good Hawkeye creates more value in 15 seconds than most Duelists create in full team fight.
Team-Up Ability: Allied Agents (Hawkeye + Black Widow)
Activation: Automatically triggers when both heroes are on same team
Effect: Black Widow gains 20% damage boost. Additionally, Black Widow can see and damage Hawkeye’s Hunter’s Sight Afterimages, doubling team elimination potential during ultimate.
Tactical Usage: Double hitscan sniper compositions are rare in ranked (most teams prefer only one sniper), but on maps with long sightlines (Wakanda, Midtown), this team-up creates overwhelming ranged pressure that enemies can’t contest without dedicated dive comp.
Reality Check: This team-up is rarely worth drafting around. Two snipers on same team often means insufficient frontline presence or dive threat. The 20% damage boost helps Black Widow but doesn’t fundamentally change team dynamics. Prioritize team composition over forcing team-up synergy.
For complete breakdown of all team-up abilities and their strategic applications, see our Marvel Rivals team-ups guide.
Counters & Matchups
Characters That Counter Hawkeye
Spider-Man (C Tier but Hawkeye-Specific Threat) – Web Nightmare
Spider-Man’s web-swing mobility creates unpredictable movement patterns impossible to track with Archer’s Focus. His Web Cluster ability deals burst damage during dives that often forces Crescent Slash without securing kill. Experienced Spider-Man players bait Crescent Slash, wait for 6-second cooldown, then re-engage when Hawkeye is vulnerable.
Counterplay: Save Crescent Slash specifically for Spider-Man dives. Don’t waste it on other threats. When he web-slings onto you, Crescent Slash immediately → Skyward Leap backward toward tanks → call for peel. Never try to 1v1 him—his burst damage exceeds your self-peel capacity.
Psylocke (C Tier but Hawkeye-Specific Threat) – Teleport Assassin
Psylocke’s psychic blade teleportation allows her to appear directly on Hawkeye’s position with zero warning. Her burst combo (teleport → blades → Psi-Slash) can 100-to-0 Hawkeye in under 2 seconds before Crescent Slash animation completes. She excels at tracking Hawkeye’s cooldowns and only engages when both Crescent Slash and Skyward Leap are unavailable.
Counterplay: Request your off-tank (Venom, Magik) pressure Psylocke specifically to keep her distracted. Play grouped with teammates—Psylocke hesitates diving into 3+ enemies. When she teleports onto you, Crescent Slash → Hypersonic Arrow to slow → immediately call “DOVE HAWKEYE” for team peel.
Venom (A Tier) – Dive Tank Pressure
Venom’s Symbiotic Surge allows him to swing directly onto Hawkeye with massive burst damage. His 600+ HP pool means Hawkeye needs 5+ fully-charged headshots to kill him, but Venom only needs 3 hits to eliminate Hawkeye. His self-sustain makes poke damage ineffective—he heals faster than Hawkeye damages from range.
Counterplay: Shoot Venom as much as possible BEFORE he reaches you—chip 200 HP with poke shots. Call for focus fire when he dives. Use Crescent Slash to create gap, then Skyward Leap toward tank line. Never engage 1v1—you will lose even with perfect aim.
Daredevil (S+ Tier) – Chain Combo Threat
Daredevil’s Billy Club Ricochet provides mobility that makes tracking with Archer’s Focus nearly impossible. His chain combos deal 250+ HP in under 2 seconds if he lands full rotation. Hawkeye’s 250 HP pool means one successful Daredevil engage equals instant death without team peel.
Counterplay: Play grouped with team—Daredevil hesitates diving into 3+ enemies. When he engages you, Crescent Slash immediately interrupts his combo chains, then dash toward allies for peel. Request tank specifically mark and pressure Daredevil—he can’t dive if constantly threatened by frontline.
Doctor Strange (A Tier) – Shield Counter
Strange’s shields block Piercing Arrow shots, protecting himself and allies. His portals allow instant repositioning that breaks Archer’s Focus buildup. Eye of Agamotto can stun Hawkeye mid-ultimate activation, wasting Hunter’s Sight entirely. During Hawkeye’s ultimate, Strange can portal to safety or shield himself, making Afterimages worthless.
Counterplay: Track Strange’s shield cooldowns (approximately 8 seconds between uses). Bait shield by firing uncharged shots, wait for it to expire, then commit fully-charged headshot. During your ultimate, target enemies BEHIND Strange rather than Strange himself—Afterimages bypass shield if you shoot them.
Characters Hawkeye Counters
Iron Man (S+ Tier) – Airborne Target Practice
Iron Man’s flight makes him predictable target for Hawkeye’s hitscan-like projectiles. His large hitbox and extended airborne duration provide easy 1-second Archer’s Focus buildup. Two fully-charged headshots eliminate Iron Man before he can retreat. Hypersonic Arrow grounds him, setting up guaranteed elimination combo.
Why You Win: Iron Man needs to be airborne to deal optimal damage. Hawkeye’s entire kit specializes in deleting airborne targets. The matchup heavily favors Hawkeye unless Iron Man plays exclusively from ground level (reducing his effectiveness).
Storm (B Tier) – Ultimate Counter
Storm’s Goddess of Thunder ultimate requires her to hover while channeling. This creates 8-10 second window where she’s stationary airborne target—perfect for Hawkeye. Hypersonic Arrow grounds her mid-ultimate, canceling it entirely. Her projectile-based attacks are easy to deflect with Ronin Slash.
Human Torch (Seasonal Meta Dependent) – Flying Target
Similar to Iron Man, Human Torch’s airborne mobility makes him vulnerable to Hawkeye’s Hypersonic Arrow → Piercing Arrow combo. His fire-based attacks have projectile travel time that Hawkeye can sidestep, while Piercing Arrow requires no leading at Hawkeye’s optimal range.
Mantis (A Tier) – Low Mobility Support
Mantis has limited escape options and 200 HP, making her ideal target for Hawkeye’s one-shot elimination. Her Spore Slumber sleep requires close range, meaning she can’t threaten Hawkeye without massively overextending. She’s forced to hide constantly or die repeatedly.
Luna Snow (A Tier) – Stationary Healer
Luna’s healing animation requires brief stationary positioning. These windows provide easy Archer’s Focus buildup and guaranteed headshot opportunities. Her 250 HP pool means one fully-charged headshot eliminates her. Without Luna, enemy team loses primary sustain source.
Pro Tips & Advanced Strategies
Positioning Mastery
The 35-40 Meter Sweet Spot
Season 1 nerfs reduced Archer’s Focus trigger distance from 60m to 40m. This means Hawkeye’s optimal engagement range is now 35-40 meters from enemy frontline. Closer than 35m and you’re vulnerable to dive threats. Farther than 40m and Archer’s Focus doesn’t trigger, reducing damage by 70 points.
Practice maintaining this exact distance. Use map landmarks as reference points—on Midtown, stand at the street intersection, on Tokyo 2099, position at the central tower’s edge. Constantly monitor your positioning relative to enemy tanks.
High Ground Dominance
Elevated positions provide multiple advantages: (1) Better sightlines to enemy backline, (2) Easier escape routes via Skyward Leap, (3) Harder dive paths for enemies, (4) Superior Hunter’s Sight angles capturing more Afterimages.
On every map, identify 2-3 high ground positions accessible via double jump. Rotate between these spots every 30 seconds to avoid becoming predictable. Enemy flankers will learn your position and hard-dive you if you remain stationary.
Off-Angle Principle
Don’t stand directly behind your tank line. Position at 45-degree angles from your frontline. This creates crossfire that forces enemies to choose: face your tank OR face you. They can’t effectively fight both simultaneously.
Off-angles also make you harder to dive since flankers must commit deeper to reach you. If they tunnel-vision you, they’re easily collapsed on by your team. If they respect your position, you get free shots on their backline.
Cooldown Management
Crescent Slash Priority System
With 6-second cooldown, you get approximately 10 Crescent Slash uses per minute. Prioritize usage:
- Immediate dive threats (Spider-Man on your face = instant Crescent Slash)
- Combo eliminations (Enemy at 170 HP = Crescent Slash finishes them faster than charging second arrow)
- Environmental kills (Near ledges, knock divers off for instant elimination)
- NEVER waste on poke (Don’t slash full-HP enemies for 60 chip damage)
Track your cooldowns mentally: “Crescent Slash on cooldown for 6 seconds, play safer.” After using it, position more conservatively until cooldown expires. This awareness prevents deaths from being caught without self-peel.
Hypersonic Arrow Timing
8-second cooldown = approximately 7-8 uses per minute. Optimal usage:
- Anti-air priority (Iron Man/Storm flying = immediate Hypersonic Arrow)
- Finishing tool (~50 damage secures low-HP eliminations)
- Slow setup (Hypersonic Arrow slow → easy Piercing Arrow headshot)
Don’t spam Hypersonic Arrow on cooldown. Save it for guaranteed value situations. Against teams with no flyers, its primary value becomes slow effect for easier headshots.
Map-Specific Tactics
Midtown (City Streets)
Control the Bifrost elevator rooftops. This central high ground provides 360-degree sightlines down all streets while offering vertical escape. Use Hunter’s Sight from elevator top during payload final push—the aerial angle captures entire objective.
Rotate between three positions: (1) Elevator rooftop, (2) Street-level behind payload, (3) Side building roofs. Cycling positions prevents enemy flankers from learning your pattern.
Tokyo 2099 (Rooftop Battlefield)
Abuse the central tower rooftops. Multi-level design creates natural cover from enemy snipers while providing clear shots to their backline. Skyward Leap allows instant vertical repositioning between levels when dove.
Hunter’s Sight from tower top is devastating—captures all ground-level enemies in one activation. The rooftop elevation makes Afterimages easy to target while enemies struggle to reach you.
Klyntar (Symbiote Jungle)
Narrow pathways funnel enemies into predictable positions. Position near environmental ledges—Crescent Slash can knock divers off for instant eliminations without requiring headshots.
The jungle cover makes Archer’s Focus harder to build (constant LOS breaking), so adjust playstyle toward rapid-fire uncharged shots instead of full-charge focus shots.
Wakanda (Throne Room)
Wide-open throne room is dangerous for Hawkeye. Play behind pillars using them as line-of-sight blockers. Peek only to fire shots, immediately return to cover.
On payload defense, constantly reposition. Standing still for 3+ seconds gets you deleted by enemy Hela/Punisher crossfire. Use Skyward Leap to change pillars unpredictably.
Competitive Callouts & Communication
Essential Callouts:
- “Ulting in 3, 2, 1” (Hunter’s Sight timing so team engages simultaneously)
- “Crescent Slash on cooldown” (tanks know to peel harder when you’re vulnerable)
- “[Enemy] one-shot” (after landing bodyshot, team focuses for easy elimination)
- “Being dove [flanker name]” (requests immediate peel from off-tank)
- “Iron Man/Storm airborne, focusing” (team knows not to expect other targets eliminated)
Team Coordination:
Ask your tank to call engage timing: “Magneto going in 3, 2, 1” so you’re positioned optimally when fight starts. Similarly, coordinate Hunter’s Sight with teammate ultimates—type “ULTING IN 5, GROUP MID” so team stacks for synchronized ultimate chain.
Ranked Strategy:
In solo queue (no voice), type at match start: “Hawkeye – will focus backline and flying targets, need peel against dives.” Sets expectations and reduces tilt when you can’t solo-carry 1v5. Ask for specific picks in draft: “Can someone run Doctor Strange? Need portals vs their dive comp.”
Common Mistakes to Avoid
Positioning Errors
Mistake: Playing isolated from team in flanking positions
Fix: Hawkeye is NOT a flanker. Stay within 30 meters of your frontline so tanks can peel when you’re dove. Isolated Hawkeye = dead Hawkeye.
Mistake: Standing stationary in same position for 30+ seconds
Fix: Reposition every 15-20 seconds. Enemy flankers track your location and hard-dive once they know where you are. Constant movement makes you unpredictable.
Mistake: Face-tanking damage to maintain Archer’s Focus
Fix: No shot is worth dying for. If you’re taking 100+ damage, break LOS immediately and reset. Dead Hawkeye deals 0 DPS. Staying alive matters more than landing one extra elimination.
Aim & Mechanical Errors
Mistake: Firing uncharged shots constantly without building Archer’s Focus
Fix: Each shot should be deliberate. Take 1 second to build full focus, then fire fully-charged headshot. Uncharged spam reduces your damage by 70+ points per shot.
Mistake: Switching targets rapidly without securing eliminations
Fix: Commit to ONE target until they die or retreat. Every target switch resets Archer’s Focus to zero. Better to 100% kill one target than 50% damage two targets.
Mistake: Aiming at tanks when squishy targets are available
Fix: Prioritize: Supports > Low-HP DPS > Full-HP DPS > Tanks. Never shoot tanks unless literally zero other targets exist. They have 3x your elimination time.
Cooldown Management Errors
Mistake: Using Crescent Slash on full-HP enemies for chip damage
Fix: Save Crescent Slash exclusively for divers or combo eliminations. Wasting it on poke means no self-peel for 6 seconds.
Mistake: Wasting Hypersonic Arrow on grounded enemies at long range
Fix: Save Hypersonic Arrow for airborne heroes or guaranteed slow setups. The ~50 damage at range isn’t worth 8-second cooldown.
Mistake: Using Skyward Leap aggressively to chase eliminations
Fix: Double jump is defensive tool, not offensive. Chasing kills with your only mobility = feeding when enemies collapse on you.
Ultimate Usage Errors
Mistake: Activating Hunter’s Sight from behind walls with no enemy vision
Fix: Ultimate only captures enemies you can SEE. Position for wide sightline before activating. From behind wall = 0-1 Afterimages captured.
Mistake: Using ultimate when already winning fight 5v3
Fix: Save ultimate for close fights or next engagement. If you’re dominating anyway, ulting wastes it—you’d win without it.
Mistake: Standing in open during activation animation
Fix: Activate from behind cover. The 1-second animation leaves you vulnerable. Getting killed mid-activation wastes ultimate entirely.
Frequently Asked Questions
Is Hawkeye good for beginners?
No. Hawkeye has a 4/5 difficulty rating because his effectiveness depends entirely on mechanical aim skill. If you can’t consistently land headshots (40%+ headshot accuracy), Hawkeye contributes less value than easier Duelists like Iron Fist or Star-Lord.
New players should start with Strategists (Luna Snow, Mantis) that have lower aim requirements or Duelists with forgiving hitboxes (Punisher, Scarlet Witch). Once you have 20+ hours in Marvel Rivals and understand positioning fundamentals, then transition to Hawkeye for his higher skill ceiling.
Practice Requirement: Expect 15-20 hours before consistent 40% headshot accuracy. By 40+ hours, you’ll track moving targets instinctively. At 60+ hours, Hawkeye becomes extension of your aim—you’ll rank among most feared DPS players.
How do I improve my Hawkeye aim?
Training Routine (15 minutes daily):
- 5 minutes: Headshot-only practice on stationary training bots (builds muscle memory)
- 5 minutes: Track moving bots while strafing yourself (simulates real team fights)
- 5 minutes: Quick Play focusing ONLY on landing first shot of each engagement (not eliminations)
Focus on crosshair placement (pre-aim at head height) more than flick shots. 70% of good aim is positioning crosshair where enemies’ heads will be before they appear in your sights. This eliminates need for large flicks and improves consistency.
Sensitivity Recommendation:
Hawkeye requires precise tracking, so mid-range sensitivity works best. Recommended: 800 DPI with 4-6 in-game sensitivity. This allows smooth tracking for Archer’s Focus buildup while maintaining flick potential for airborne targets. Lower sensitivity (2-4) works if you prefer arm aiming. Higher sensitivity (7-10) only if experienced with wrist aiming.
What’s the optimal Archer’s Focus timing?
Archer’s Focus requires approximately 1 second of continuous tracking to reach maximum +70 bonus damage. However, many team fights don’t provide full 1-second windows before enemies receive healing or break LOS.
Decision Framework:
- Clear shots (1+ second window): Build full Archer’s Focus → fully-charged headshot = 390 damage
- Contested shots (0.5 second window): Fire rapid uncharged shots = 160-240 damage faster than waiting for focus
- Against high-sustain comps (Luna + Mantis healing): Rapid-fire beats focus buildup—enemies heal faster than you charge
Track whether your target is receiving healing. If Luna Snow is actively healing them, abandon Archer’s Focus buildup and spam rapid shots instead. By the time you build full focus, they’ll be full HP again.
When should I use Hunter’s Sight ultimate?
Optimal times:
- Team fight initiation when both teams are grouped (captures 4-5 Afterimages)
- Objective overtime when enemies cluster on payload/control point
- When you have high ground position with clear view of enemy team
- After enemy commits major cooldowns (Strange portal used, Venom dove, etc.)
Suboptimal times:
- Early poke phase before team fight commitment (enemies just hide for 8 seconds)
- When positioned behind walls with limited LOS (captures 0-1 Afterimages)
- Against Doctor Strange who can shield himself, negating Afterimage damage
- When you’re being dove (activation animation gets you killed)
Aim to use Hunter’s Sight 4-6 times per 10-minute competitive match. Holding too long wastes value, but using reactively without proper positioning wastes ultimate.
How do I climb ranked with Hawkeye?
Bronze to Gold:
Focus on mechanical fundamentals. Land 40%+ headshot accuracy and you’ll win games through raw damage output. At these ranks, positioning matters less than landing shots. Practice aim in training mode before each session.
Platinum to Diamond:
Learn to track enemy cooldowns. If Spider-Man just used Web Cluster, you have 8 seconds to play aggressive before he can dive again. Communicate with team: “Need peel backline, Venom diving.” Start identifying which enemies specifically hunt you and play around their patterns.
Diamond to Celestial:
Master off-angle positioning and crossfire creation. Your positioning should force enemies to choose between facing your tank OR facing you. Coordinate Hunter’s Sight timing with team’s ultimate combos. At high ranks, Hawkeye becomes macro-game hero—your positioning dictates enemy movement and ultimate usage.
For complete ranked system breakdown including rank distribution and what ranks can queue together, read our Marvel Rivals ranks guide.
Pro Tip for Ranked:
Duo queue with a Doctor Strange or Magneto main who understands backline protection. Solo queue depends on random tanks who might not peel—coordinated duo queue guarantees at least your tank knows to protect you from dives.
What are best crosshair settings for Hawkeye?
Crosshair Style: Small dot or thin cross (not thick cross). Hawkeye’s Piercing Arrow is projectile with minimal travel time, so you need minimal crosshair obstruction to see targets clearly.
Color: High-contrast color that stands out against all map backgrounds. Cyan or bright green works on most maps. Avoid red (blends with enemy health bars) or white (blends with bright environments).
Opacity: 80-100%. You need clear crosshair visibility at all times. Lower opacity makes tracking harder during chaotic team fights.
Additional Settings:
- Enable “Show Allied Health Bars Through Walls” at 100% opacity so you can see which teammates need protection
- Increase Enemy Outline intensity for easier target acquisition
- Enable “Damage Numbers” to confirm headshots (320+ damage = headshot landed)
Conclusion
Hawkeye is Marvel Rivals’ ultimate skill expression hero and the most lethal precision sniper for players willing to invest in mastering mechanical aim. His combination of unlimited ammo Piercing Arrow, Archer’s Focus damage amplification, and game-changing Hunter’s Sight ultimate makes him an S-tier pick at all skill levels—provided you can consistently land headshots. Unlike forgiving heroes that generate value through sustain or crowd control, Hawkeye lives and dies by mechanical execution.
Key Takeaways:
- Fully-charged headshot with Archer’s Focus deals 390 damage—one-shots most Strategists and Duelists
- Maintain 35-40 meter positioning from enemy frontline for optimal Archer’s Focus trigger distance (Season 1 nerf)
- Crescent Slash and Skyward Leap are defensive tools—save exclusively for dive threats and escapes
- Hunter’s Sight requires high ground positioning with clear enemy LOS to capture multiple Afterimages
- Pair with Doctor Strange, Magneto, or Mantis for maximum protection and setup potential
- Dominate airborne heroes (Iron Man, Storm, Human Torch) with Hypersonic Arrow combo
- Practice 40%+ headshot accuracy before taking Hawkeye into ranked—mechanical skill determines entire value
Season 1 Impact:
January 10, 2025 balance changes reduced Hawkeye’s oppressive long-range dominance by decreasing Archer’s Focus trigger distance (60m → 40m) and maximum bonus damage (80 → 70). Additionally, his Season bonus was reduced from 20% to 15%. These changes force Hawkeye to position closer to enemy frontline, increasing dive vulnerability while maintaining his identity as premier one-shot sniper. Adapt by playing more aggressively with improved awareness of dive threats.
Learning Curve:
Expect 15-20 hours to develop consistent headshot accuracy and Archer’s Focus management. By 40+ hours, you’ll predict enemy movement patterns instinctively and land 50%+ headshots. At 60+ hours, Hawkeye becomes extension of your aim—you’ll rank among most impactful DPS players in any match, capable of solo-carrying through pure mechanical dominance.
Finding Your Squad
Ready to team up with Vanguards who’ll actually peel for backline DPS? Finding tanks who understand that protecting Hawkeye = winning fights makes all the difference between solo queue frustration and coordinated ranked success.
Marvel Rivals supports full crossplay functionality across PC, PlayStation, and Xbox, so you can squad up with anyone regardless of platform. Use GameTree’s Discord LFG bot for instant teammate matching—just type /lfg Marvel Rivals in any server with GameTree installed for basic matchmaking.
Want personality-based matching that pairs you with players who share your communication style and won’t rage when you miss shots? Download the GameTree app for deeper teammate compatibility beyond just skill-based matching.
Continue Learning
Mastering Hawkeye is just the beginning. Explore our other Marvel Rivals resources:
- Marvel Rivals Tier List – Updated rankings for all heroes across all roles
- Team Compositions Guide – Master poke comps, dive comps, and counter-strategies
- Marvel Rivals Ranks – Complete ranked system breakdown, rewards, and climb strategies
- Marvel Rivals LFG Hub – Find teammates instantly through our Discord bot
Sources
- Marvel Rivals Wiki (Fandom) – Hawkeye abilities and statistics (December 2024)
- Marvel Rivals Version 20250110 Season 1 Balance Patch Notes (January 10, 2025)
- Mobalytics.gg Hawkeye Guide (Updated December 2024)
- DeltiaGaming Marvel Rivals Hawkeye Guide (December 8, 2024)
- Screen Rant Marvel Rivals Hawkeye Build Guide (December 22, 2024)
- Community consensus from competitive play and high-level Hawkeye players
- Official Marvel Rivals social media announcements (@MarvelRivals)
- GameSpot Season 1 Balance Update Coverage (January 8, 2025)