Punisher Guide: Abilities, Counters & Tips | Marvel Rivals
Marvel Rivals Punisher – Complete Guide
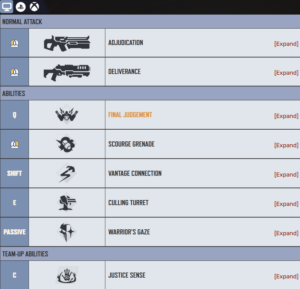
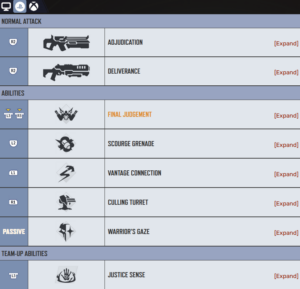
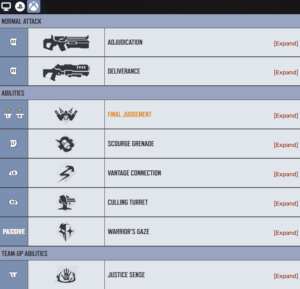
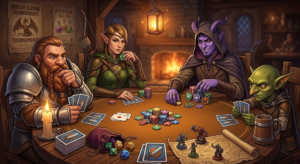
Punisher’s Abilities (Images via Marvel Rivals Wiki)
Last Updated: January 11, 2025
Author: Darren Buser
The Punisher is Marvel Rivals’ most beginner-friendly Duelist and one of the game’s most consistent damage dealers. Frank Castle brings an arsenal of futuristic weaponry to the battlefield, switching between automatic rifle and shotgun while deploying devastating turrets and ziplines. As one of Marvel’s most iconic vigilantes, Frank Castle’s straightforward approach to combat makes him the perfect entry point for new players. After receiving significant buffs in Season 5.5—including increased health from 275 to 300 HP, improved Adjudication damage (19 to 20 per hit), and better damage falloff—he’s become one of the most reliable picks across all skill levels. Ranked as S Tier in our comprehensive tier list, his versatility at all ranges and straightforward kit make him the perfect entry point for players new to hero shooters.
Role: Duelist (High-DPS)
Difficulty: 1/5 (Beginner-Friendly)
Health Pool: 300 HP (buffed from 275 in Season 5.5)
Best For: Consistent poke damage, backline pressure, controlling airborne heroes, new players
Key Strengths
- Dual weapon system allows adaptation to any range—Adjudication rifle for long-range poke, Deliverance shotgun for close-quarters elimination
- Higher HP than most Duelists at 300 HP, providing survivability buffer for positioning mistakes
- Hitscan weapons mean instant hit registration with no projectile travel time to learn
- Culling Turret provides stationary high-damage option for zone control and objective defense
- Vantage Connection zipline enables rapid repositioning and high ground access
- Warrior’s Gaze passive reveals enemies through walls for 3 seconds, preventing ambushes
- Ammo Overload team-up with Rocket Raccoon and Winter Soldier grants unlimited ammunition and increased fire rate
- One-star difficulty rating makes him ideal for beginners while maintaining high-level competitive viability
- Final Judgement ultimate delivers massive AoE damage with crowd-control immunity during activation
Looking for teammates who understand proper positioning and peel priority? The Punisher thrives when Vanguards create space for him to work. GameTree’s Discord LFG bot helps you find Marvel Rivals players who actually protect backline DPS instead of diving 1v6. Just type /lfg Marvel Rivals in any Discord server with GameTree installed.
Quick Overview: Punisher’s Playstyle
The Punisher functions as a versatile damage dealer who excels at controlling mid-range engagements while adapting to close or long-range threats as needed. Unlike specialists who dominate one range (Hela at long-range, Wolverine at melee), Punisher positions 15-25 meters from the frontline, using Adjudication to chip away at enemy health bars, then swapping to Deliverance when enemies close the gap or when securing eliminations on wounded targets.
The key to mastering Punisher is understanding when to play aggressive versus defensive. His 300 HP pool and lack of escape abilities (Vantage Connection has 20-second cooldown) mean positioning mistakes get punished hard. However, his ability to output consistent damage from relative safety makes him incredibly forgiving for new players learning map awareness and target priority.
Punisher’s win condition is simple: maintain constant pressure through sustained damage, force enemy cooldowns and resources, then capitalize during Culling Turret windows or Final Judgement ultimate. He excels in extended brawls where his consistent DPS wears down enemy supports’ healing capacity. Against coordinated teams, his lack of mobility makes him vulnerable to dive comps, requiring strong peel from Vanguards and Strategists to survive.
Abilities Breakdown
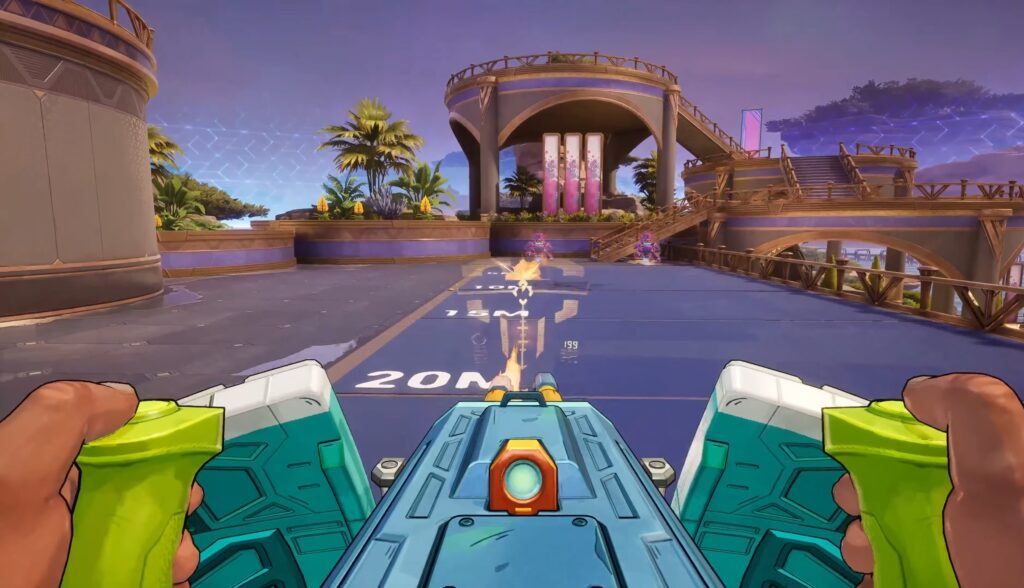
Primary Weapons: Adjudication (Rifle) & Deliverance (Shotgun)
Adjudication (Automatic Rifle – Default Primary Fire)
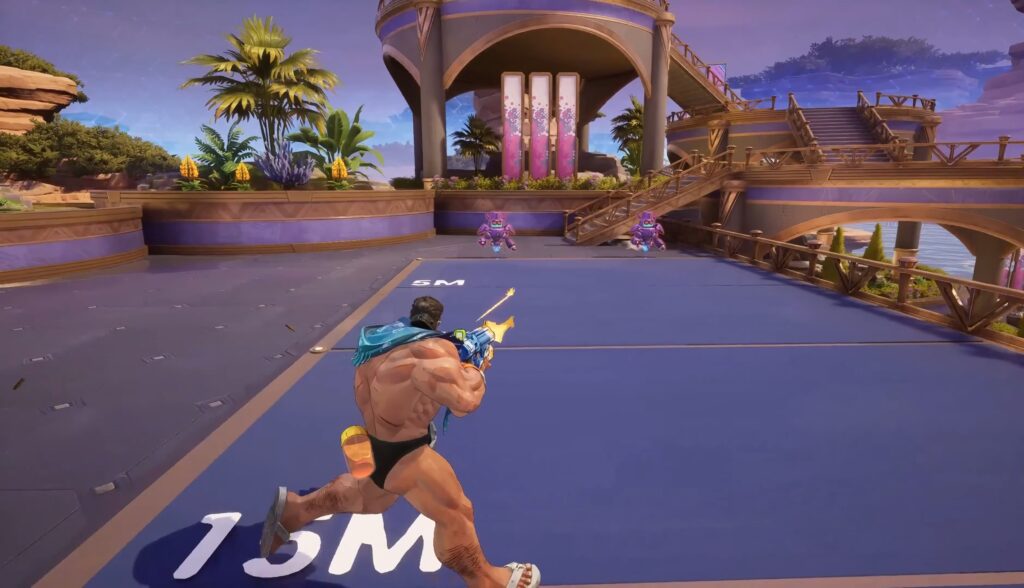
Punisher’s Primary Fire in Marvel Rivals (Image via IGN)
Description: Fully automatic hitscan rifle that delivers consistent medium-to-long-range damage. The Punisher’s bread-and-butter weapon for poking enemy frontlines and pressuring backline supports.
Statistics (As of Season 5.5 – December 2025):
- Damage per hit: 20 (buffed from 19 in Season 5.5)
- Fire rate: Approximately 10 rounds per second
- Magazine size: 35 rounds
- Reload time: ~2 seconds
- Range: Effective at 10-40 meters
- Damage falloff: Begins at 40 meters, reduces to 85% at maximum range (improved from 70% in Season 5.5)
- Type: Hitscan (instant hit registration – bullets hit instantly with no projectile travel time)
- Headshot multiplier: 2x damage (40 per headshot)
Tactical Tips:
- Poke damage priority—Your job is whittling down enemy HP pools before team fights begin. Target enemy supports first (Luna Snow, Mantis), then low-HP Duelists, then Vanguards when no better targets exist
- Ammo discipline—With 35 rounds and 2-second reload, you can sustain fire for 3.5 seconds. Reload behind cover after emptying 25+ rounds rather than waiting for complete depletion
- Headshot practice—While bodyshots are reliable, headshots double your damage output. Aim for head height on stationary targets (enemy supports healing, Hawkeye holding angles)
- Airborne dominance—Adjudication’s hitscan nature makes you the counter to flying heroes (Iron Man, Storm, Human Torch). Prioritize airborne targets—they’re easier to track than ground-based mobile heroes
- Range optimization—Stay at 15-30 meter range where Adjudication maintains full damage. Beyond 40 meters, damage falloff makes eliminations difficult against healing pressure
Advanced Technique: Burst fire at extreme range (40+ meters) rather than full auto. Three-round bursts maintain accuracy while minimizing damage loss from falloff, allowing you to pressure enemy snipers (Hela, Hawkeye) without exposing yourself to full damage trades.
Deliverance (Shotgun – Secondary Primary Fire)
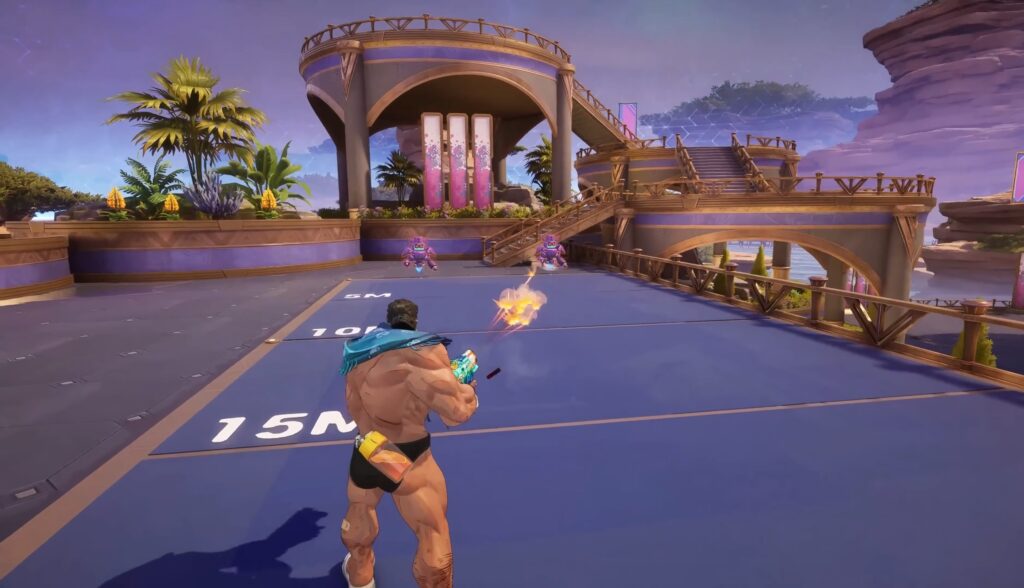
Punisher’s Secondary Primary Fire in Marvel Rivals (Image via IGN)
Description: High-damage close-range shotgun that fires multiple pellets per shot. Punisher’s answer to diving flankers and melee threats.
Statistics (Season 5.5 Buffs):
- Pellets per shot: 16 (increased from 14 in Season 5.5)
- Damage per pellet: ~10 HP
- Maximum damage per shot: 160 HP (all 16 pellets hit at point-blank)
- Effective range: 0-10 meters
- Fire rate: Slower than Adjudication (~1 shot per second)
- Magazine size: 8 rounds
- Reload time: ~2.5 seconds (slower than Adjudication)
- Headshot multiplier: 2x damage per pellet (320 maximum damage on perfect headshot)
- Spread pattern: Moderate (requires close proximity for all pellets to connect)
Tactical Tips:
- Anti-dive primary tool—When Spider-Man, Psylocke, or Iron Fist engage you, immediately swap to Deliverance. One headshot (320 damage) eliminates most Duelists before they complete their combo
- Flank punishment—If enemy flankers path behind your team, Deliverance’s burst damage can one-shot 275 HP heroes with headshot at close range
- Finish wounded targets—When enemies retreat at low HP (50-100 HP remaining), Deliverance secures elimination faster than Adjudication’s sustained fire
- Reload vulnerability—Deliverance’s 2.5-second reload leaves you vulnerable. After firing 6+ shots, retreat to cover before reloading
- Don’t engage at range—Beyond 10 meters, pellet spread reduces Deliverance to 40-60 damage per shot. Swap to Adjudication for mid-range fights
Common Mistake: Players waste Deliverance attempting to finish long-range targets. The pellet spread at 15+ meters means you’re dealing 25% of maximum damage—ineffective against healing pressure. Use Deliverance exclusively within 10 meters where all 16 pellets connect.
Crowd Control: Scourge Grenade / Smoke Grenade (E Key)
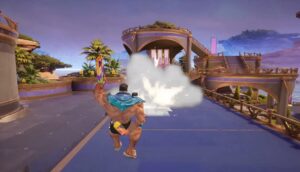
Punisher’s Smoke Grenade Fire in Marvel Rivals (Images via IGN)
Description: Throw a smoke grenade forward that detonates on impact, creating a smoke cloud that obscures enemy vision for both allies and enemies. Provides knockback to both Punisher and enemies hit by the explosion.
Statistics:
- Explosion damage: Minimal (~30 HP)
- Knockback distance: ~8 meters (affects both Punisher and enemies)
- Smoke duration: ~4 seconds
- Smoke radius: ~6 meters
- Cooldown: ~12 seconds
- Range: ~25 meters thrown distance
Tactical Tips:
- Defensive escape primary use—When dove by melee heroes (Wolverine, Iron Fist, Daredevil), throw Scourge Grenade at your feet. The knockback creates 8 meters of separation while smoke obscures their vision, allowing you to swap to Adjudication and retreat toward your team
- Zone denial on objectives—Throw grenade onto payload or control point during enemy push. The smoke forces enemies to either wait 4 seconds or push through blindly, disrupting their coordination
- Breaking line of sight—Against enemy snipers (Hela, Hawkeye), throw smoke between you and them to block their sightlines. This gives you 4 seconds to reposition without taking damage
- Knockback repositioning—The mutual knockback can be used offensively to create distance from melee threats or defensively to escape when Vantage Connection is on cooldown
- Vision disruption doesn’t affect everyone equally—Heroes with radar abilities (Daredevil) or who don’t rely on vision (melee heroes at point-blank range) are less affected by smoke
Pro Tip: Coordinate Scourge Grenade with your team’s ultimates. Throw smoke onto grouped enemies during Luna Snow’s freeze ultimate or Scarlet Witch’s Chaos Control—the vision disruption prevents them from coordinating escapes while your team executes combos.
Mobility: Vantage Connection (Shift)
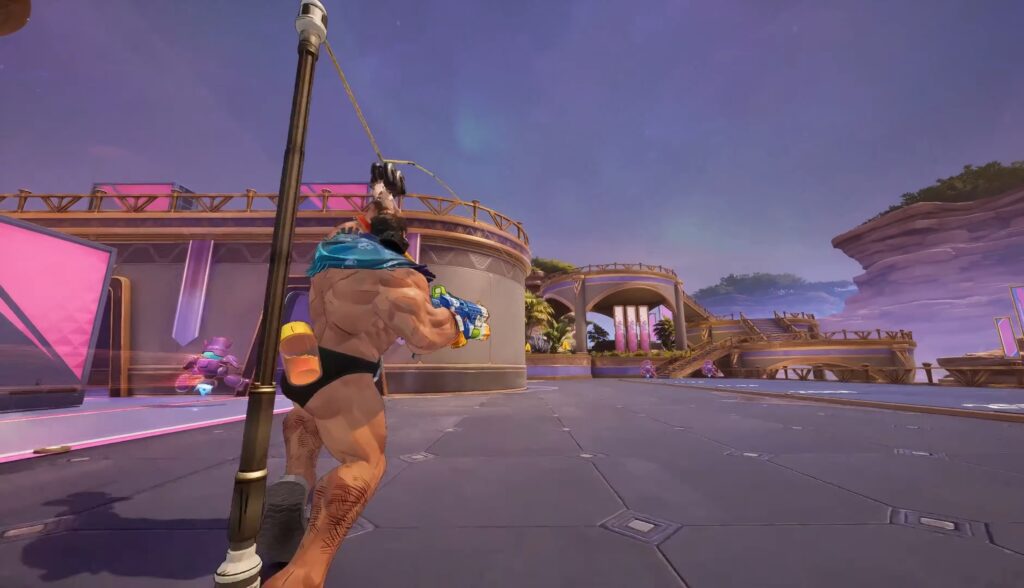
Punisher’s Mobility in Marvel Rivals (Image via IGN)
Description: Fire a hook that attaches to any surface, creating a persistent zipline cable that Punisher can use to rapidly travel along. The cable remains active indefinitely, allowing multiple uses until manually destroyed or replaced.
Statistics:
- Maximum range: ~40 meters
- Travel speed along cable: High (covers 40m in ~2 seconds)
- Cooldown: 20 seconds (one of longest mobility cooldowns in game)
- Cable persistence: Infinite until replaced or destroyed
- Exit momentum: Can jump off cable mid-travel to maintain forward momentum for extended distance
- Maximum cables active: 1 (new cable destroys previous)
Tactical Tips:
- High ground access—Use Vantage Connection to reach elevated positions that provide superior sightlines for Adjudication poke. Rooftops on Midtown and Tokyo 2099 maps become accessible
- Escape routes pre-placement—Before team fights begin, place zipline pointing toward your team’s backline. When dove, you have immediate escape rather than waiting for 20-second cooldown
- Momentum slingshot—Jump off zipline mid-travel (press space bar) to maintain forward velocity while gaining height. This creates unpredictable movement for dodging projectiles
- One-way vision advantage—Position zipline to take you above enemy sightlines. Enemies must look up to shoot you (difficult tracking angle) while you shoot down at them (easier tracking)
- NEVER use offensively without backup—The 20-second cooldown means using Vantage Connection to chase eliminations leaves you with zero escape for 20 seconds. Only use aggressively when your team is already winning the fight 5v3 or better
Advanced Strategy: On payload maps, place zipline parallel to payload path pointing toward your spawn. As payload advances, your zipline provides constant escape route without needing to replace it. This maximizes uptime since cooldown is so long.
Defensive Tool: Culling Turret (Q Key)
Punisher’s Culling Turret in Marvel Rivals (Image via IGN)
Description: Deploy a stationary armored skull-shaped turret that roots Punisher in place while transitioning to first-person perspective. Fires rapid fire explosive projectiles that deal both direct damage and AoE damage in small radius around impact.
Statistics:
- Direct damage per bullet: ~40 HP
- Explosion damage per bullet: ~15 HP in 2-meter radius
- Fire rate: Extremely high (~15 rounds per second)
- Duration: Indefinite until manually exited or Punisher is eliminated
- Turret HP: 250 (turret itself can be destroyed)
- Cooldown: 20 seconds (begins when turret is destroyed or exited)
- Crowd control immunity: Punisher cannot be stunned, knocked back, or displaced while in turret
- Movement: Complete immobility—Punisher is rooted at activation location
- Reload: Infinite ammo, no reload needed
Tactical Tips:
- Choke point control—Place Culling Turret at narrow corridors or objective entrances. Enemies must either destroy 250 HP turret or take alternate path, both of which delay their push
- Counter-dive after engagement—When flankers commit to diving your position, activate Culling Turret. The crowd control immunity prevents their displacement abilities from interrupting your fire, and the high damage output often eliminates them before they can retreat
- Ultimate pairing—Culling Turret excels during team fight chaos. When multiple enemies are distracted by your Vanguards, activate turret and focus fire on enemy supports. Your crowd control immunity prevents them from stopping your pressure
- NEVER use in open areas—Culling Turret’s immobility makes you vulnerable to snipers (Hela can headshot you twice before you exit). Only activate from behind cover or during team fights where enemies can’t focus you freely
- Exit timing matters—Don’t wait until turret is destroyed. Exit manually when enemies begin focusing you (75%+ of turret HP gone) to preserve the cooldown advantage
Pro Tip: During Final Judgement ultimate, you’re already crowd control immune and mobile. Don’t waste Culling Turret during your ultimate—save it for after when enemies counterattack, and you need defensive positioning.
Passive: Warrior’s Gaze

Punisher’s Passive in Marvel Rivals (Image via IGN)
Description: When enemies break line of sight by moving behind walls or obstacles, Punisher retains vision of enemies for 3 additional seconds through their highlighted silhouette. This provides crucial information about enemy positioning and prevents ambushes.
Statistics:
- Reveal duration: 3 seconds after enemy breaks line of sight
- Range: Unlimited (as long as enemy was in Punisher’s vision when they broke LOS)
- Visual indicator: Red highlighted silhouette visible through walls
- Activation: Automatic when any enemy breaks line of sight
Tactical Tips:
- Wallbang opportunities—On maps with destructible environments, Warrior’s Gaze reveals enemy positions behind thin walls. Spray Adjudication through cover to damage retreating enemies
- Flanker awareness—When enemy Spider-Man or Psylocke web/teleport behind obstacles, their 3-second reveal tells you exactly where they’re positioning for dive. Call out to your team: “Psylocke flanking left behind pillar”
- Predict enemy retreats—Low-HP enemies often retreat behind cover to receive healing. Warrior’s Gaze shows their exact position, allowing you to swap to Deliverance, zipline around cover, and secure elimination before heals arrive
- Ultimate tracking—When enemies activate ultimates that require setup (Scarlet Witch channeling, Hawkeye charging), their movement is telegraphed by Warrior’s Gaze if they briefly break LOS. This provides information for counter-positioning
Important Note: Warrior’s Gaze is detection, not true vision. You can’t shoot through walls at revealed enemies—the silhouette shows positioning only. Use this information to predict angles and communicate flanks to your team.
Ultimate: Final Judgement (Z Key)
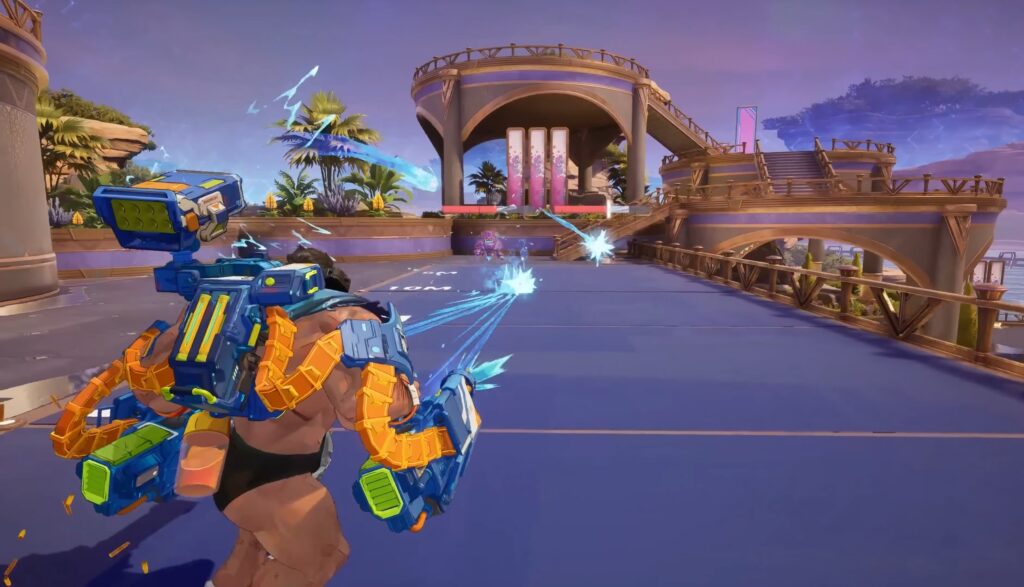
Punisher’s Ultimate in Marvel Rivals (Image via IGN)
Description: Punisher deploys dual gatling guns and shoulder-mounted missiles, transforming into a walking weapons platform. Gains complete crowd control immunity and deals massive sustained AoE damage for the duration.
Statistics:
- Duration: 10 seconds
- Gatling gun damage: ~25 HP per hit (both guns firing simultaneously)
- Missile damage: ~80 HP direct hit + ~40 HP AoE in 3-meter radius
- Fire rate: Extremely high for gatling guns (~20 rounds per second combined)
- Missile rate: Fires 2 missiles every 1.5 seconds
- Crowd control immunity: Complete immunity to stuns, knockbacks, slows, and displacement
- Movement speed: Reduced by ~30% during ultimate
- Activation time: ~1 second animation (vulnerable before CC immunity activates)
- Ultimate charge rate: Approximately 90 seconds with average damage output
Tactical Tips:
- Objective team fights—Final Judgement excels when enemies group on payload or control point. The AoE damage from missiles hits multiple targets simultaneously, and the 10-second duration often outlasts enemy defensive cooldowns
- Tank shredding—Vanguards (Magneto, Groot, Doctor Strange) with 600-700 HP can’t easily escape your sustained damage. During Final Judgement, prioritize eliminating enemy tanks to remove their frontline protection, exposing backline supports
- Counter-ultimate timing—Activate Final Judgement when enemy support pops major healing ultimate (Luna Snow’s freeze, Rocket’s resurrection device). Your sustained damage can out-DPS their healing if you focus fire priority targets
- Crowd control immunity means aggression—Unlike your normal gameplay where positioning mistakes are fatal, Final Judgement’s CC immunity allows you to walk directly into enemy team without fear of displacement. Use this to zone enemies off objectives
- NEVER activate in open sightlines against snipers—Hela and Hawkeye can still land headshots during your ultimate. The reduced movement speed makes you easier target. Activate from cover or behind your Vanguards
Common Mistake: Players activate Final Judgement when already winning fights 5v2. This wastes ultimate that could swing close fights. Save it for: (1) Contested objectives during overtime, (2) Breaking defensive holds when pushing payload final meters, (3) Counter-engaging when enemy uses 2+ ultimates and your team needs equalizer.
Team Synergies
The Punisher thrives in sustained brawl compositions where his consistent damage output wears down enemy resources over extended engagements. He struggles in pure dive comps that abandon him in backline. Here are his best teammates across all roles:
Best Vanguard Partners
Magneto (S+ Tier) – Bubble Protection
Magneto’s separated Metal Bulwark (ally shield) and Iron Bulwark (self shield) cooldowns mean he can bubble Punisher when being dove while simultaneously protecting himself. Magneto’s Metallic Curtain also blocks unlimited projectile damage, creating windows where Punisher can freely use Culling Turret without taking return fire. Check our Magneto guide for optimal bubble timing strategies with backline DPS.
Why It Works: Punisher lacks mobility—his 20-second Vantage Connection cooldown means he needs external protection. Magneto provides this while also benefiting from Punisher’s consistent damage pressure on enemy frontline.
Doctor Strange (A Tier) – Portal Escape
Doctor Strange’s portal ability provides instant repositioning for Punisher when dove or caught out of position. His Eye of Agamotto ultimate also creates space by stunning grouped enemies, allowing Punisher to activate Culling Turret and melt stunned targets without retaliation. Strange’s shields block incoming damage while Punisher focuses on outputting pressure.
Peni Parker (B Tier) – Zone Control Synergy
Peni’s Cyber-Webs now provide allies with 25% movement speed and 15 HP/second healing (Season 5 buff). When Punisher positions near Peni’s web zones, he gains passive sustain that offsets poke damage without needing Strategist attention. Peni’s Spider-Drones also deter flankers from engaging Punisher, creating safe zones for Culling Turret activation.
Venom (A Tier) – Frontline Chaos Creator
Venom’s aggressive dive playstyle forces enemy attention toward frontline, creating windows where Punisher can freely poke with Adjudication. When Venom swings into enemy backline, their supports must choose: heal Venom’s damage or heal Punisher’s poke. This resource split favors your team.
Best Duelist Partners
Hela (S Tier) – Double Backline Pressure
The ultimate poke duo. Both heroes dominate long sightlines and force enemy positioning mistakes. Hela’s two-headshot elimination potential on supports pairs perfectly with Punisher’s consistent chip damage—you soften targets to 50% HP, Hela finishes with single headshot. When either is dove, the other provides covering fire for escape.
Why It Works: Double ranged DPS comps force enemies to commit heavy dive resources to eliminate backline (leaving frontline vulnerable) or accept constant poke damage and die slowly.
Hawkeye (S Tier) – Sniper Support
Hawkeye’s precision picks complement Punisher’s sustained pressure. Punisher forces enemy cooldowns with Adjudication poke, Hawkeye capitalizes with charged headshots on targets that pop defensive abilities. His trick arrows also provide additional crowd control, making it easier to land Deliverance headshots on stunned/slowed enemies.
Winter Soldier (S Tier) – Ammo Overload Team-Up
The Ammo Overload team-up (Rocket Raccoon, Punisher, Winter Soldier) is one of the strongest offensive combinations in Marvel Rivals. When Rocket places Ammo Overload device, both Punisher and Winter Soldier gain unlimited ammunition and increased fire rate. This transforms Punisher’s Adjudication into infinite suppressive fire that pressures multiple targets simultaneously. Winter Soldier’s Kraken Impact ultimate becomes even deadlier when combined with unlimited ammo buff.
Phoenix (A Tier) – Resurrection Insurance
Phoenix’s Rebirth ultimate resurrects fallen teammates, providing insurance for Punisher’s aggressive positioning mistakes. If Punisher gets caught by dive comp and eliminated, Phoenix brings him back with invulnerability window, preventing the 20-second respawn walk. This enables slightly more aggressive Culling Turret positioning knowing resurrection is available.
Best Strategist Partners
Rocket Raccoon (S Tier) – Ammo Overload Duo
The primary reason to run Punisher—Rocket’s Ammo Overload team-up ability. When Rocket places his device, Punisher receives unlimited ammunition and increased fire rate for both Adjudication and Deliverance. This eliminates reload vulnerability and allows continuous pressure without downtime. Rocket’s resurrection ultimate (B.R.B.) also provides second-life insurance for aggressive Culling Turret plays.
Why It Works: Unlimited ammo Punisher can sustain 3,500 damage per minute (35 rounds × 20 damage × 5 magazines) versus normal 1,400 damage. The damage output increase justifies building entire team comp around this synergy.
Luna Snow (A Tier) – Healing + Damage Boost
Luna’s consistent healing output keeps Punisher topped off during poke exchanges. Her Absolute Zero ultimate provides team-wide freeze that sets up perfect Culling Turret activation—stunned enemies can’t focus turret while Punisher melts them. Her damage boost also amplifies Adjudication’s already strong poke damage.
Mantis (A Tier) – Damage Amplification
Mantis’s damage boost abilities significantly increase Punisher’s Adjudication output. Her Sleep Dart also sets up guaranteed Deliverance headshots on sleeping targets—walk up to sleeping enemy support, swap to Deliverance, headshot for 320 damage one-shot elimination. Her consistent healing also sustains Punisher through poke damage.
Invisible Woman (S+ Tier) – Shield Protection
Invisible Woman’s Guardian Shield provides 250 HP barrier that absorbs dive damage targeting Punisher. Her Force Physics knockback peels flankers off Punisher’s position. Her Invisible Boundary ultimate makes Punisher completely invisible while still able to attack—invisible Culling Turret firing from seemingly nowhere is devastating. For complete Invisible Woman synergy strategies, see our Invisible Woman guide.
Team-Up Abilities
Ammo Overload (Punisher + Rocket Raccoon + Winter Soldier)
Activation: Rocket Raccoon places Ammo Overload device on ground as Team-Up Anchor
Effect: All allies standing in device’s radius (including Punisher and Winter Soldier) gain unlimited ammunition and increased fire rate. Device remains active until destroyed by enemies or expires after duration.
Tactical Usage: This is the strongest offensive team-up in current meta. Position near Rocket’s device during team fights to maintain unlimited Adjudication/Deliverance ammo. The increased fire rate means Adjudication fires ~15 rounds per second instead of 10, increasing DPS by 50%. Use this window to activate Culling Turret with unlimited explosive rounds—you can sustain turret fire for entire team fight without worrying about running dry.
Pro Tip: Coordinate Final Judgement ultimate timing with Rocket’s Ammo Overload activation. The combination of unlimited ammo + increased fire rate + ultimate’s enhanced damage output creates 15-second window where Punisher becomes unstoppable damage machine capable of solo team-wiping if enemies don’t immediately retreat.
Operation: Microchip (Retired in Season 5)
Note: This team-up with Black Widow was removed in Season 5 patch notes. Punisher lost his Team-Up Anchor bonus of +25 HP and +5% damage output. This guide reflects Season 5+ gameplay without this team-up.
Counters & Matchups
Characters That Counter Punisher
Hela (S Tier) – Range Superiority
Hela’s hitscan primary fire with no damage falloff at any range means she can two-headshot Punisher from distances where Adjudication’s damage falloff (85% at 40+ meters) makes trading ineffective. Her aerial Goddess of Death ultimate forces Punisher to either activate Culling Turret (making him stationary target) or retreat entirely. Punisher’s 300 HP and lack of mobility make him easy target for skilled Hela players.
Counterplay: Never challenge Hela at 40+ meter range. Stay at 20-30 meters where Adjudication maintains full damage. Use Vantage Connection to reach high ground positions that break her sightlines. When she activates Goddess of Death, use Scourge Grenade smoke to obscure her vision while you reposition behind cover or teammates.
Hawkeye (S Tier) – Sniper Threat
Hawkeye’s charged arrows deal 200+ damage on headshots, nearly one-shotting Punisher. His ability to hold angles indefinitely means any predictable positioning (especially during Culling Turret activation) becomes death sentence. Punisher’s reduced movement speed during Final Judgement ultimate also makes him easier target for charged shots.
Counterplay: Constantly reposition—never stand still for more than 3 seconds. Use Vantage Connection to create unpredictable movement patterns. When activating Culling Turret, do so behind cover or your Vanguards, never in Hawkeye’s sightline. Request your off-tank (Venom, Daredevil) to dive Hawkeye specifically to keep him pressured.
Magneto (S+ Tier) – Projectile Negation
Magneto’s Metallic Curtain blocks unlimited projectile damage, completely negating Adjudication’s sustained fire. His Metal Bulwark shields on allies nullify Punisher’s poke damage, forcing you to break 200 HP shields before dealing actual damage. Worse, his Metal Magnetism ultimate absorbs your Final Judgement projectiles and turns them into massive damage ball that can team-wipe your squad.
Counterplay: Don’t spam Adjudication into Magneto’s Metallic Curtain—you’re feeding his ultimate charge for free. Wait for Curtain cooldown (3 seconds), then resume fire. Against Metal Magnetism ultimate, immediately cease fire and retreat. Do NOT use Final Judgement when Magneto has ultimate ready—he’ll absorb everything and one-shot your team.
Spider-Man (C Tier but Punisher-Specific Threat) – Mobility Nightmare
Spider-Man’s web swings and wall-climbing create unpredictable movement patterns that make tracking with Adjudication difficult. His Web Cluster ability deals burst damage during dives that often forces your Scourge Grenade even without securing kill. Worse, experienced Spider-Man players bait Vantage Connection, wait for 20-second cooldown, then re-engage when Punisher is vulnerable.
Counterplay: Swap to Deliverance the moment Spider-Man web-slings onto you. His predictable landing pattern after web-swing means you can pre-aim at landing location and headshot (320 damage) for instant elimination. Stay grouped with your team—Spider-Man hesitates diving into 3+ enemies. Call for peel from Strategists when he engages.
Iron Fist (A Tier) – Melee Pressure
Iron Fist’s chain dash combos can eliminate Punisher from 300 to 0 HP in 2 seconds if he lands full rotation. His mobility via Iron Fist Kick allows him to close 25-meter gaps instantly, negating Punisher’s range advantage. Punisher’s 20-second Vantage Connection cooldown means frequent Iron Fist dives become overwhelming.
Counterplay: Always keep one Scourge Grenade charge off cooldown when facing Iron Fist. When he dashes onto you, grenade at your feet for 8-meter knockback separation, then immediately swap to Deliverance for headshot as he recovers. Position near your Vanguards—Iron Fist is less effective when enemies can peel his combos.
Characters Punisher Counters
Iron Man (S+ Tier) – Airborne Deletion
Iron Man’s flight makes him easy target for Punisher’s hitscan Adjudication. His large hitbox and predictable flight patterns mean consistent 50-60% accuracy hits. Punisher can pressure Iron Man at all ranges with zero damage falloff concerns (Adjudication falloff starts at 40m, Iron Man typically hovers at 20-30m). His Unibeam ultimate requires standing relatively still—free Culling Turret activation opportunity.
Why You Win: Iron Man needs to be airborne to deal damage effectively. Punisher’s hitscan with instant hit registration means every shot connects regardless of Iron Man’s movement. 300 HP Iron Man dies to 15 Adjudication headshots—easily achievable over 8-second period.
Storm (B Tier) – Aerial Control
Similar to Iron Man, Storm’s Goddess of Thunder ultimate requires hovering position. Punisher’s Adjudication maintains full damage at ranges where Storm deals damage, and her larger hitbox makes landing consistent bodyshots easy. Her projectile-based attacks have travel time that Punisher can sidestep, while his hitscan requires no leading.
Wolverine (B Tier) – Range Kiting
Wolverine needs extended melee range to deal damage and heal via passive. Punisher’s Adjudication keeps him at 20+ meter distance where Wolverine can’t threaten elimination. Scourge Grenade knockback prevents Wolverine from closing gaps via Feral Leap, and Vantage Connection allows escape when he eventually reaches melee range.
Why You Win: Wolverine’s only gap closer is Feral Leap (12-second cooldown in Season 5). Scourge Grenade has 12-second cooldown. You can match his engage with your disengage, keeping him permanently at range where he’s useless. Even if he reaches you, Deliverance headshot chunks 320 HP from his 400 HP pool.
Mantis (A Tier) – Low Mobility Support
Mantis has limited escape options and 200 HP, making her ideal target for Punisher’s Adjudication sustained pressure. Her Spore Slumber sleep requires close range (15 meters), meaning she can’t threaten Punisher without massively overextending. Punisher dominates this matchup by maintaining 20-25 meter spacing where she can’t sleep him but he can pressure her freely.
Luna Snow (A Tier) – Consistent Pressure
Luna Snow’s healing output is strong but not infinite. Punisher’s sustained Adjudication damage (200 DPS with perfect accuracy) forces Luna to use healing on herself rather than teammates. His Final Judgement ultimate can out-DPS her healing during team fights. Her freeze ultimate provides brief reprieve, but Scourge Grenade knockback can separate you from freeze radius.
Pro Tips & Advanced Strategies
Weapon Swapping Mastery
The Range Rule
Memorize these engagement distances for optimal weapon selection:
- 0-10 meters: Deliverance only. All 16 pellets connect for maximum damage
- 10-15 meters: Situational—Deliverance if target is isolated and you can secure headshot, otherwise Adjudication
- 15-40 meters: Adjudication exclusively. Full damage with no falloff
- 40+ meters: Adjudication but expect 15% damage reduction. Consider repositioning closer
Animation Canceling
Weapon swap animation takes ~0.3 seconds. You can reduce this by:
- Fire last Adjudication round
- Begin weapon swap during recoil recovery (press keybind)
- Deliverance is ready before Adjudication would finish reload
This saves ~1.7 seconds compared to reloading Adjudication then swapping, crucial for eliminating diving threats.
Positioning for Different Team Comps
Brawl Comp (2 Vanguards, 2 Strategists, 1 Duelist)
Position 20 meters behind your main tank. This puts you within Strategist healing range while maintaining safe distance from enemy frontline. Use Adjudication to pressure enemy supports, forcing them to heal frontline rather than poke your tanks. When your tanks engage, activate Culling Turret from behind them—they body-block enemy fire while you melt backline.
Poke Comp (1 Vanguard, 3 Ranged DPS, 2 Strategists)
Stand alongside other ranged DPS (Hela, Hawkeye) at 25-30 meters from enemy frontline. Coordinate focus fire—when Hela lands one headshot on enemy support, immediately swap to Deliverance and zipline forward to finish elimination with shotgun. Rotate between high ground positions using Vantage Connection to create crossfire angles.
Dive Comp (Struggles – Not Recommended)
Punisher doesn’t excel in pure dive. His lack of mobility (20s Vantage Connection cooldown) means he can’t follow diving teammates (Daredevil, Magik, Spider-Man). If forced into dive comp, stay with your remaining Vanguard/Strategist and provide covering fire for divers. Don’t chase—let them secure picks, you hold position and prevent enemy counter-dive on your backline.
Cooldown Management Priority System
With both Vantage Connection and Culling Turret on 20-second cooldowns (longest in game), you must track when abilities are available:
Priority 1: Vantage Connection
Use ONLY for: (1) Accessing high ground pre-fight, (2) Escaping guaranteed death when Scourge Grenade is on cooldown, (3) Repositioning after team wipe when reset is needed. NEVER use to chase eliminations or take aggressive angles unless team is already winning 5v3+.
Priority 2: Culling Turret
Use when: (1) Defending choke points/objectives, (2) Enemy dive has committed and you’re safe from snipers, (3) During team fights where enemy attention is split. Avoid using in: (1) Open areas with Hela/Hawkeye sightlines, (2) When you’re isolated from team, (3) During poke phase before team fight commits.
Priority 3: Scourge Grenade
Most flexible cooldown. Use for: (1) Immediate dive threats, (2) Vision disruption against snipers, (3) Objective zone denial. The 12-second cooldown means you get it back frequently—don’t hoard it.
Map-Specific Tactics
Midtown (City Streets)
Control the Bifrost elevator high ground using Vantage Connection. This central position provides 360-degree sightlines down all streets while offering cover from building structures. Place zipline pointing toward your spawn for instant escape route. Activate Culling Turret from elevator platform during payload pushes—enemies must push uphill into your fire or take long flanks.
Tokyo 2099 (Rooftop Battlefield)
Abuse rooftop high ground near central tower. The multi-level design creates natural cover from enemy snipers while providing clear Adjudication sightlines to their backline. Place Vantage Connection connecting two rooftop buildings, creating rotation path that avoids ground-level choke points. Final Judgement from rooftops creates unavoidable AoE pressure since enemies have limited vertical escape options.
Klyntar (Symbiote Jungle)
The narrow pathways funnel enemies into predictable Adjudication firing lanes. Place Scourge Grenade at choke points before team fights—smoke + narrow corridors = complete vision denial. Culling Turret becomes incredibly powerful here since enemies can’t easily flank around turret position. Watch for environmental kill opportunities—Scourge Grenade knockback near ledges can eliminate enemies instantly.
Wakanda (Throne Room)
The wide-open objective area is dangerous for Punisher. Play behind the pillars, using them as cover between Adjudication bursts. Vantage Connection should connect pillar-to-pillar rather than accessing high ground (too exposed to snipers). On payload defense, activate Culling Turret behind payload itself—it provides cover while you melt pushing enemies.
Ultimate Timing & Win Conditions
When To Use Final Judgement
Optimal times:
- Payload final 10 meters (offense or defense) during overtime—the 10-second duration can contest long enough for respawns
- Control point overtime when 3+ enemies are grouped—missiles hit multiple targets simultaneously
- Counter-engaging when enemy uses 2+ ultimates—your CC immunity lets you stand ground while team recovers
- Breaking defensive holds on choke points—walk through choke during Final Judgement, forcing enemies off position
Suboptimal times:
- When already winning 5v2—save for next fight
- Against Magneto with ultimate ready—he’ll absorb all your damage
- In open sightlines vs Hela/Hawkeye—they’ll headshot you despite ult
- During poke phase before commitment—enemies just hide for 10 seconds
Aim to use Final Judgement 5-7 times per 10-minute match. Holding too long wastes value, but panic-using when losing 2v5 wastes it entirely.
Competitive Callouts & Communication
Essential Callouts
- “Ulting in 3 seconds, push with me” (Coordinates team engagement with Final Judgement timing)
- “Vantage Connection on cooldown 20 seconds, play safe” (Team knows you have zero escape)
- “[Enemy support] one-shot from Adjudication” (Focus fire for easy elimination)
- “Being dove, need peel” (Requests immediate Strategist/Vanguard assistance)
- “Activating turret backline, cover me” (Team positions to body-block while you fire)
Ranked Ladder Strategy
In solo queue (no voice comms), type at match start: “Punisher – will pressure backline and control fliers, need peel against dives.” This sets expectations and reduces tilt when you can’t 1v3 dive comps alone. Request specific counters in draft: “Can someone run Doctor Strange? Need portals for repositioning.”
Diamond+ Tip: Duo queue with Rocket Raccoon main who understands Ammo Overload timing. Solo queue Punisher depends on random supports—coordinated duo guarantees at least your Strategist maximizes your kit’s potential.
Common Mistakes to Avoid
Positioning Errors
Mistake: Playing isolated from team in aggressive flanking positions
Fix: Punisher is not a flanker. Stay within 20-25 meters of your Vanguards. You need their peel when dove, and they need your sustained damage pressure to create space. Isolated Punisher = dead Punisher.
Mistake: Standing still for extended periods (especially during Adjudication sustained fire)
Fix: Maintain constant movement. Strafe while firing, reposition after every 15 rounds fired. Standing still makes you easy target for Hela/Hawkeye headshots. Your hitscan accuracy doesn’t require stationary positioning.
Weapon Swap Errors
Mistake: Staying on Adjudication when enemy closes to melee range
Fix: The moment enemy enters 10-meter range (Spider-Man web-slings onto you, Iron Fist dashes), immediately swap to Deliverance. Hesitating for “one more Adjudication burst” gets you killed. Deliverance’s 320-damage headshot is your only answer to diving threats.
Mistake: Using Deliverance at 20+ meter range
Fix: Deliverance beyond 10 meters deals 25% damage due to pellet spread. You’re wasting time—swap to Adjudication. If enemy is 20 meters away, they’re in Adjudication range, not Deliverance range.
Cooldown Management Errors
Mistake: Using Vantage Connection to chase low-HP enemies
Fix: The 20-second cooldown is your ONLY mobility tool. Using it aggressively leaves you with zero escape for 20 seconds. Enemies will punish this. Save Vantage Connection for: (1) Pre-fight positioning, (2) Escaping dives. Never for chasing.
Mistake: Activating Culling Turret in open areas against sniper comps
Fix: Culling Turret’s immobility makes you free headshot target for Hela/Hawkeye. Only activate when: (1) Behind cover, (2) During team fight chaos where snipers can’t freely target you, (3) Protected by Vanguard shields/bubbles.
Mistake: Hoarding Scourge Grenade “for emergencies”
Fix: With 12-second cooldown, you get Scourge Grenade every other fight. Use it liberally for: (1) Vision disruption, (2) Knockback escapes, (3) Zone denial. Holding it for “perfect moment” means you’re playing without an ability for extended periods.
Ultimate Usage Errors
Mistake: Using Final Judgement when enemy has easy cover/escape routes
Fix: Final Judgement is most effective on open objectives (control points, payload final push) where enemies must contest or lose. Against teams with nearby cover, they just hide for 10 seconds, and you wasted ultimate. Use it when enemies are forced to stand and fight.
Mistake: Activating Final Judgement after your team is already eliminated
Fix: Final Judgement won’t clutch 1v5 situations. If your team just lost fight and you’re last alive, retreat and save ultimate for next fight with full team. Wasting it solo means you don’t have it for winnable engagements.
Frequently Asked Questions
Is Punisher good for beginners?
Yes! Punisher has a 1/5 difficulty rating specifically because his kit is straightforward and forgiving. His hitscan weapons require no projectile prediction (unlike Hela or Star-Lord), his abilities are simple to understand, and his 300 HP provides buffer for positioning mistakes. He’s the ideal starting Duelist for players new to hero shooters.
Learning path: Spend first 5 hours mastering Adjudication aim and basic positioning (stay near team, don’t overextend). Next 10 hours, practice weapon swapping to Deliverance against divers. By 20 hours, you’ll understand cooldown management and ultimate timing. At 40+ hours, Punisher becomes second nature, and you’ll consistently top damage charts.
How do I improve my Punisher aim?
Training routine (15 minutes daily):
- 5 minutes: Headshot-only practice on moving training bots with Adjudication
- 5 minutes: Weapon swap drills—fire Adjudication at long-range bot, swap to Deliverance for close-range bot, repeat
- 5 minutes: Quick Play focusing ONLY on target priority (supports > low-HP DPS > tanks)
Sensitivity recommendation: Punisher needs tracking for sustained fire, but doesn’t require flick shots. Recommended: 800 DPI with 5-7 in-game sensitivity. Higher sensitivity (8-10) only if you’re experienced with wrist aiming. Lower sensitivity (3-5) if you prefer arm aiming.
Crosshair placement: Pre-aim at chest height (not head height). Adjudication’s recoil naturally pulls upward toward head with sustained fire, so starting at chest level lets recoil “climb” into headshots naturally. This technique increases headshot accuracy by 20-30% for most players.
When should I use Culling Turret vs staying mobile?
Use Culling Turret when:
- Defending choke points/objectives and enemies must push into you
- Enemy dive has committed and you’re protected by team
- During team fights where enemy attention is split across multiple threats
- You have clear sightlines without sniper exposure (Hela/Hawkeye)
Stay mobile when:
- Poke phase before team fight commits (no need to root yourself)
- Enemy snipers have clear sightlines to your position
- You’re isolated from team and vulnerable to collapse
- Enemy has displacement ultimates ready (Scarlet Witch, Doctor Strange)
Rule of thumb: If you’re unsure whether to turret, don’t. Mobile Punisher dealing 70% damage is better than dead turret Punisher dealing 0%. Only turret when you’re confident you won’t get instantly focused.
How do I deal with dive comps targeting me?
Pre-fight setup:
- Place Vantage Connection zipline pointing toward your team (pre-planned escape)
- Position 15-20 meters behind tanks (closer than usual for peel availability)
- Keep Scourge Grenade off cooldown (save for dive)
- Communicate: “Watch for dives on backline”
When dove:
- Scourge Grenade at your feet (creates 8m separation + smoke)
- Swap to Deliverance immediately
- Land headshot on diver during their recovery from knockback
- If they survive, use Vantage Connection to escape toward team
- Call “DOVE, NEED PEEL” for Strategist/Vanguard assistance
Prevention: Play grouped with team. Divers (Spider-Man, Psylocke, Iron Fist) hesitate attacking backline when 3+ enemies can immediately peel. Isolated Punisher is easy kill. Protected Punisher forces divers to overextend and die.
What’s Punisher’s role in Season 5’s meta?
In Season 5’s meta, Punisher functions as consistent damage engine in brawl compositions (2-2-1 or 1-3-2 comps). His job is maintaining pressure on enemy frontline and backline, forcing their Strategists to use healing on poke damage rather than enabling aggressive plays.
In 2-2-1 comp (two Vanguards, two Strategists, one Duelist):
Punisher is often the solo Duelist paired with sustain-heavy supports (Luna Snow + Rocket Raccoon). His sustained damage justifies solo DPS slot because Ammo Overload team-up transforms him into unlimited damage machine. Position behind double Vanguard frontline, use Adjudication to pressure enemy supports. When your tanks engage, activate Culling Turret to melt exposed enemies.
Meta positioning: Season 5 favors anchor tank compositions with Magneto, Groot, and Peni Parker receiving major buffs. Punisher excels in these slower-paced brawls where his sustained damage outvalues burst damage heroes (Hela, Hawkeye) over 30+ second team fights. Check our team compositions guide for complete 2-2-1 meta strategies.
Should I always run Punisher with Rocket Raccoon?
Short answer: Heavily recommended but not mandatory.
Why Rocket pairing is strong:
Ammo Overload team-up (unlimited ammo + increased fire rate) increases Punisher’s DPS by 150-200%. You go from 200 DPS (normal Adjudication) to 500+ DPS (unlimited ammo Adjudication). This justifies building entire team comp around Punisher + Rocket core.
When to skip Rocket:
If your team needs primary healer and you already have Rocket (secondary healer), someone else should swap to Luna Snow or Mantis. Don’t force double-off-support composition just for Ammo Overload. Proper healing > damage boost if it means your tanks die in 5 seconds.
Alternative team-ups:
Without Rocket, Punisher functions as standard sustained damage dealer. Pair with Vanguards who provide protection (Magneto bubbles, Doctor Strange shields) rather than relying on team-up synergies. He’s still S-tier without Rocket, just not “unlimited ammo god-tier.”
How do I climb ranked with Punisher?
Bronze to Gold:
Focus on aim fundamentals. Land 40%+ accuracy with Adjudication, and you’ll win games purely through damage output. At these ranks, positioning matters less than raw damage. Spam Adjudication at grouped enemies, swap to Deliverance when they close gaps.
Platinum to Diamond:
Learn target priority. Stop shooting tanks—prioritize enemy supports (Luna Snow, Mantis) first, then low-HP Duelists, then tanks when nothing better exists. Communicate in voice: “Mantis one-shot, focus her.” Track enemy dive cooldowns—if Spider-Man just used Web Cluster, you have 8 seconds to play aggressive before he can dive again.
Diamond to Celestial:
Master cooldown economy and ultimate timing. Never waste Vantage Connection on chases. Coordinate Final Judgement with team’s engage timing (type “ULTING IN 5 SECONDS” so team pushes with you). Position to maintain 20-25 meter spacing from frontline while staying within Strategist healing range. At high ranks, Punisher’s macro-game (positioning, cooldown management, communication) matters more than micro-game (raw aim).
Pro Tip for Ranked:
Duo queue with Rocket Raccoon main, who understands Ammo Overload timing. Solo queue Punisher relies on random supports who might not maximize your kit. Coordinated duo guarantees at least your Strategist knows when to place device and coordinate pushes around unlimited ammo windows.
For a complete ranked system breakdown, including rank distribution, rewards, and what ranks can queue together, read our Marvel Rivals ranks guide.
Best settings and keybinds for Punisher?
Keybind Recommendations:
- Weapon swap: Easily accessible key (Middle Mouse Wheel or V) for instant swapping
- Scourge Grenade (E): Default is fine, needs quick access for emergency escapes
- Vantage Connection (Shift): Standard mobility key
- Culling Turret (Q): Comfortable ultimate-adjacent key
- Final Judgement (Z or Q): Whichever feels more natural for your hand
Sensitivity:
Punisher needs tracking for sustained Adjudication fire, but also quick target acquisition for Deliverance flicks. Recommended: 800 DPI, 5-7 in-game sensitivity. Test by tracking moving training bots—if you’re overshooting, lower sensitivity. If you’re trailing behind, increase it.
Crosshair:
Use small dot or cross (NOT circle). Punisher’s hitscan weapons require precise aim point, and minimal crosshair helps focus on enemy hitboxes. Color: Bright contrasting color (cyan, yellow, magenta) that stands out against all map backgrounds.
Visual Settings:
Enable “Show Damage Numbers” to track Adjudication hits. Enable “Allied Health Bars Through Walls” to see when teammates need peeling. Increase FOV to 100-110 for better peripheral vision (helps spot flankers).
Conclusion
The Punisher is Marvel Rivals’ most accessible and reliable Duelist, offering consistent damage output across all ranges with a beginner-friendly one-star difficulty rating. His combination of hitscan weapons (Adjudication rifle + Deliverance shotgun), versatile abilities (Scourge Grenade, Vantage Connection, Culling Turret), and game-changing Ammo Overload team-up make him an S-tier pick for players from Bronze to Celestial ranks. Season 5.5’s buffs—300 HP, improved Adjudication damage and falloff, and increased Deliverance pellets—have cemented his position as one of the most balanced heroes in the current meta.
Key Takeaways:
- Switch between Adjudication (15-40m) and Deliverance (0-10m) based on engagement distance
- Maintain 20-25 meter positioning behind your Vanguards for optimal poke while staying in healing range
- Save Vantage Connection for pre-fight positioning and emergency escapes—never aggressive chases
- Activate Culling Turret only when protected by team or during chaotic team fights
- Pair with Rocket Raccoon for Ammo Overload team-up that transforms you into unlimited damage machine
- Use Final Judgement for contested objectives and breaking defensive holds, not winning already-won fights
- Target priority: Enemy supports > Low-HP DPS > Airborne heroes > Vanguards
Learning Curve:
Expect 5-10 hours to become comfortable with weapon swapping and basic positioning. By 20 hours, you’ll understand cooldown management and when to activate Culling Turret safely. At 40+ hours, Punisher’s gameplay becomes second nature, and you’ll consistently top damage charts across all game modes. At 80+ hours, you’ll master advanced techniques like animation canceling and ultimate timing coordination.
Finding Your Squad
Ready to team up with Vanguards who actually peel for backline instead of diving 1v6? Finding teammates who understand that protecting Punisher = winning fights makes all the difference between solo queue frustration and coordinated ranked success. Marvel Rivals supports full crossplay functionality across PC, PlayStation, and Xbox, so you can squad up with anyone regardless of platform.
Use GameTree’s Discord LFG bot for instant teammate matching—just type /lfg Marvel Rivals in any server with GameTree installed. Want deeper compatibility matching that pairs you with players who share your communication style and won’t rage-quit after a single loss? Download the GameTree app for personality-based teammate matching.
Continue Learning
Mastering Punisher is just the beginning. Explore our other Marvel Rivals resources:
- Marvel Rivals Tier List – Updated rankings for all heroes across all roles
- Team Compositions Guide – Master the 2-2-1 meta, dive comps, and counter-strategies
- Marvel Rivals Ranks – Complete ranked system breakdown, rewards, and climb strategies
- Marvel Rivals Crossplay Guide – Cross-platform play, friend codes, and party systems
- Gambit Guide – Master Season 5’s new Strategist hero
- Magneto Guide – Dominate as the S+ tier anchor tank
- Invisible Woman Guide – Complete support playstyle breakdown
Sources
- Marvel Rivals Wiki (Fandom) – Punisher abilities and statistics (December 2024)
- Marvel Rivals Version 20251114 Season 5 Balance Patch Notes (November 14, 2025)
- Marvel Rivals Version 20251212 Season 5.5 Balance Patch Notes (December 12, 2025)
- Mobalytics.gg Punisher Guide (Updated December 2024)
- Dexerto Marvel Rivals Punisher Guide (Updated December 2024)
- TheGamer Punisher Guide (Updated December 2024)
- GameRant Punisher Guide (December 2024)
- Community consensus from competitive play and high-level Punisher players
- Official Marvel Rivals social media announcements (@MarvelRivals)